这篇文章主要介绍了vue 自动生成swagger接口请求文件的方法,本文给大家介绍的非常详细,对大家的学习或工作具有一定的参考借鉴价值,需要的朋友可以参考下
前端: vue-element-admin
后端: .net core (6.0)
找了很多自动生成的代码的,感觉不太行,可能是我不太懂。所以自己根据swagger.json去生成了js请求文件。
后端很简单,就不说了,只要能访问到swagger的地址就可以,主要是前端。这个生成的比较简单,你们可以根据自己的需求修改生成文件js里的代码。前端代码也参考了网上的一些内容。
1.在项目目录下新建genSwagger文件夹,然后新建autoGen.js文件

2.autoGen.js文件内容如下,里面的内容大部分有注释,可以根据自己的项目情况做些修改
const fs = require('fs') const path = require('path') let apiData = {} // 访问swagger.json的数据 const http = require('http') const apiUrl = 'http://localhost:5227/swagger/v1/swagger.json' // swagger.json的地址,这里是本地的,可以替换成你的地址,有个问题是目前只能是http,https的不行,https会报一个证书错误 // 生成api文件的目录 function mkdirsSync(dirname) { if (fs.existsSync(dirname)) { return true } else { if (mkdirsSync(path.dirname(dirname))) { fs.mkdirSync(dirname) return true } } } function getPath(pathUrl) { return path.resolve(__dirname, pathUrl) } let dataList = [] // 真正要处理的数据 // 将swagger.json中的数据转换成我们需要的数据 function getDataList() { // 遍历apiData.paths for (const key in apiData.paths) { let routeData = {} routeData.api = key console.log('path================ ' + key) // 遍历apiData.paths[key] for (let key2 in apiData.paths[key]) { routeData.method = key2 console.log('methods============== ' + key2) let tag = apiData.paths[key][key2].tags[0] console.log('tag=====' + tag) routeData.controller = tag let params = apiData.paths[key][key2].parameters if (params) { routeData.bodyType = 'query' routeData.params = apiData.paths[key][key2].parameters } else { routeData.params = [] if (key2 === 'post' && key2 !== 'get') { routeData.bodyType = 'body' let requestBody = apiData.paths[key][key2].requestBody if (requestBody) { let content = requestBody.content if (content) { let applicationJson = content['application/json'] if (applicationJson) { let schema = applicationJson.schema if (schema) { let properties = schema.$ref if (properties) { let ref = properties.split('/') let refName = ref[ref.length - 1] let refData = apiData.components.schemas[refName] if (refData) { let refProperties = refData.properties if (refProperties) { for (let key3 in refProperties) { let param = {} param.name = key3 param.in = 'body' param.required = true param.schema = refProperties[key3] routeData.params.push(param) } } } } } } } } } } //遍历apiData.paths[key][key2] for (let key3 in apiData.paths[key][key2]) { // console.log('tags===========' + key3) if (key2 === 'get') { //routeData.params = apiData.paths[key][key2][key3].parameters } //routeData.other = apiData.paths[key][key2][key3] console.log(apiData.paths[key][key2][key3]) } console.log('xxxxxxxxxxxxxxxxxxxxxxxxxxxxx') } dataList.push(routeData) } console.log(dataList) } // 获取远程swagger.json的数据 function httpGetJson(url) { return new Promise((resolve, reject) => { http.get(url, (res) => { const { statusCode } = res const contentType = res.headers['content-type'] let error if (statusCode !== 200) { error = new Error('请求失败。\n' + `状态码: ${statusCode}`) } else if (!/^application\/json/.test(contentType)) { error = new Error('无效的 content-type.\n' + `期望 application/json 但获取的是 ${contentType}`) } if (error) { console.log('error') // 消耗响应数据以释放内存 console.error(error.message) res.resume() return } res.setEncoding('utf8') let rawData = '' res.on('data', (chunk) => { rawData += chunk }) res.on('end', () => { try { const parsedData = JSON.parse(rawData) resolve(parsedData) } catch (e) { reject(`错误: ${e.message}`) } }) }).on('error', (e) => { reject(`错误: ${e.message}`) }) }) } // 生成http请求js文件 async function createHttpJsFile() { console.log('start') apiData = await httpGetJson(apiUrl) getDataList() console.log(dataList) if (dataList.length === 0) { console.log('请先点击getUsers按钮') return } let httpJs = '' if (dataList.length > 0) { const dirPath = '/src/api-service' // dataList根据controller去重 const controllerList = [] for (let i = 0; i item.controller === controllerList[i]) console.log(controllerDataList) for (const data of controllerDataList) { const api = data.api // /api/user/getUserList // 取出api中最后一个斜杠后面的内容 const apiName = api.substring(api.lastIndexOf('/') + 1) if (data.method === 'get') { httpJs += `export async function ${apiName}(` if (data.params && data.params.length > 0) { for (let i = 0; i 0) { httpJs += `,{\n` for (let i = 0; i 0 && data.bodyType === 'query') { httpJs += 'export async function ' + apiName + '(' for (let i = 0; i 0) { for (let i = 0; i 3.在package.json下面的scripts节点下新增内容:"swagger": "node genSwagger/autoGen.js"

4.在控制台运行 npm run swagger

5.运行完成后,会在目录下面看到你生成的文件
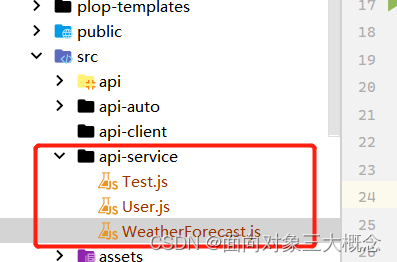
这里我只是做测试,接口较少。

上面图片里的import其实就是很简单的axios封装
代码如下:
// axios get方法 import axios from 'axios' import notification from 'element-ui/packages/notification' const baseUrl = 'https://localhost:7221' axios.defaults.timeout = 5000 axios.defaults.xsrfHeaderName = '' axios.defaults.xsrfCookieName = '' export function httpGet(url, params) { return new Promise((resolve, reject) => { axios.get(baseUrl + url, { params: params }).then(res => { resolve(res.data) }).catch(err => { reject(err.data) }) }) } // axios post方法 export function httpPost(url, params) { return new Promise((resolve, reject) => { axios.post(baseUrl + url, params).then(res => { // 拦截不是200的状态码 if (res.status !== 200) { notification.error('请求失败,状态码:' + res.status) return } resolve(res.data) }).catch(err => { console.log(err) notification.error({ title: '错误', message: '请求出错' }) reject(err.data) }) }) }这边完成后,就可以在页面上调用了

目前封装的方法可能还有点简单,但对我来说暂时够用了。
最后再附上swagger.json的数据,就是解析这些数据生成的文件。
{ "openapi": "3.0.1", "info": { "title": "WebApplication1", "version": "1.0" }, "paths": { "/api/test/getusers": { "get": { "tags": [ "Test" ], "responses": { "200": { "description": "Success" } } } }, "/api/test/add": { "post": { "tags": [ "Test" ], "requestBody": { "content": { "application/json": { "schema": { "$ref": "#/components/schemas/User" } }, "text/json": { "schema": { "$ref": "#/components/schemas/User" } }, "application/*+json": { "schema": { "$ref": "#/components/schemas/User" } } } }, "responses": { "200": { "description": "Success" } } } }, "/api/user/getUserList": { "get": { "tags": [ "User" ], "parameters": [ { "name": "keyWord", "in": "query", "schema": { "type": "string" } }, { "name": "pageIndex", "in": "query", "schema": { "type": "integer", "format": "int32" } }, { "name": "limit", "in": "query", "schema": { "type": "integer", "format": "int32" } } ], "responses": { "200": { "description": "Success" } } } }, "/api/user/add": { "post": { "tags": [ "User" ], "requestBody": { "content": { "application/json": { "schema": { "$ref": "#/components/schemas/User" } }, "text/json": { "schema": { "$ref": "#/components/schemas/User" } }, "application/*+json": { "schema": { "$ref": "#/components/schemas/User" } } } }, "responses": { "200": { "description": "Success" } } } }, "/api/user/detail": { "get": { "tags": [ "User" ], "parameters": [ { "name": "id", "in": "query", "schema": { "type": "string" } } ], "responses": { "200": { "description": "Success" } } } }, "/api/user/remove": { "post": { "tags": [ "User" ], "parameters": [ { "name": "id", "in": "query", "schema": { "type": "string" } } ], "responses": { "200": { "description": "Success" } } } }, "/WeatherForecast": { "get": { "tags": [ "WeatherForecast" ], "operationId": "GetWeatherForecast", "responses": { "200": { "description": "Success", "content": { "text/plain": { "schema": { "type": "array", "items": { "$ref": "#/components/schemas/WeatherForecast" } } }, "application/json": { "schema": { "type": "array", "items": { "$ref": "#/components/schemas/WeatherForecast" } } }, "text/json": { "schema": { "type": "array", "items": { "$ref": "#/components/schemas/WeatherForecast" } } } } } } } } }, "components": { "schemas": { "User": { "type": "object", "properties": { "id": { "maxLength": 36, "minLength": 0, "type": "string", "nullable": true }, "name": { "maxLength": 50, "minLength": 0, "type": "string", "nullable": true }, "createTime": { "type": "string", "format": "date-time" } }, "additionalProperties": false }, "WeatherForecast": { "type": "object", "properties": { "date": { "type": "string", "format": "date-time" }, "temperatureC": { "type": "integer", "format": "int32" }, "temperatureF": { "type": "integer", "format": "int32", "readOnly": true }, "summary": { "type": "string", "nullable": true } }, "additionalProperties": false } } } } 到此这篇关于vue 自动生成swagger接口请求文件的文章就介绍到这了,更多相关vue swagger接口内容请搜索0133技术站以前的文章或继续浏览下面的相关文章希望大家以后多多支持0133技术站!
以上就是vue 自动生成swagger接口请求文件的方法的详细内容,更多请关注0133技术站其它相关文章!


