这篇文章介绍了利用nginx实现动静分离的负载均衡集群实战,本次用到的操作系统及服务,本次实验一共需要3台服务器,一台nginx做为负载均衡分发器和动静分离的分发器,两台apache做为后端服务器,使用nginx实现两台apache服务器的负载均衡和动静分离,需要的朋友可以参考下
前言
大家好,我是沐风晓月,今天我们利用nginx来作为负载,实现两台apache服务器的动静分离集群实战;
一. 实验环境
1.1 系统及服务
本次用到的操作系统及服务:
本次实验一共需要3台服务器,一台nginx做为负载均衡分发器和动静分离的分发器,两台apache做为后端服务器,使用nginx实现两台apache服务器的负载均衡和动静分离。
操作系统: centos7.6
nginx 版本: 1.22 版本
apache版本: 系统默认自带的2.4.6
php版本: 系统默认自带的 5.4.16
apache和php版本,都可以升级为最新版本,可以从官网下载安装。
1.2 本次要实现的架构图
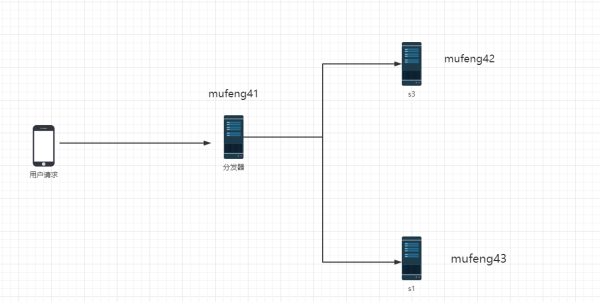
一般我们的服务器分很多种,有文件服务器,图片服务器,数据库服务器。
还有各种不同的服务:
- 静态文件处理:可以使用nginx 或apache
- 动文件处理: apache ,tomcat
- 图片文件处理: squid
本文中我们使用nginx实现动静分离的负载均衡集群。
二. nginx负载均衡详解
2.1 什么是负载均衡?
服务器的负载均衡是指将来自客户端的请求分摊到多台服务器上,以达到提高系统性能、增加系统可靠性、避免单点故障等目的的技术。
通过负载均衡,可以使得多台服务器共同处理客户端的请求,从而提高系统的整体性能和可用性。
在负载均衡中,通常会把多台服务器组成一个服务器集群,客户端向负载均衡器发送请求,负载均衡器会根据一定的算法将请求分配到服务器集群中的一台或多台服务器上进行处理。负载均衡的算法有很多种,常见的有轮询、随机、最小连接数等。
负载均衡还可以通过一些高级功能来实现更加复杂的负载均衡策略,例如会话保持、健康检查、动态调整权重等。这些功能可以根据实际需求进行配置和调整,使得负载均衡系统更加灵活和高效。
2.2 负载均衡的5中方式
Nginx 的 upstream 负载的5种方式,目前最常用 前3 种方式:
1) 轮询(默认)
每个请求按时间顺序逐一分配到不同的后端服务器,如果后端服务器 down 掉,能自动剔除。
2) weight
指定轮询几率,weight 和访问比率成正比,用于后端服务器性能不均的情况。
3) ip_hash
每个请求按访问 ip 的 hash 结果分配,这样每个访客固定访问一个后端服务器,可以解决 session 的问题。
4) air(第三方)
按后端服务器的响应时间来分配请求,响应时间短的优先分配。
5) url_hash(第三方)
按访问url的hash结果来分配请求,使同样的url定向到同一个后端服务器,后端服务器为缓存时比较有效
三. 安装nginx作为流量分发器
3.1 安装nginx前准备 安装依赖工具
[root@mufeng41 ~]# yum -y install gcc gcc-c++ autoconf automake [root@mufeng41 ~]# yum -y install zlib zlib-devel openssl openssl-devel pcre pcre-devel
沐风晓月在做这一步安装的时候,忘了挂载镜像,浪费了不少时间,所以要提前挂载,配置好yum源哦。
上传nginx压缩包,进行解压
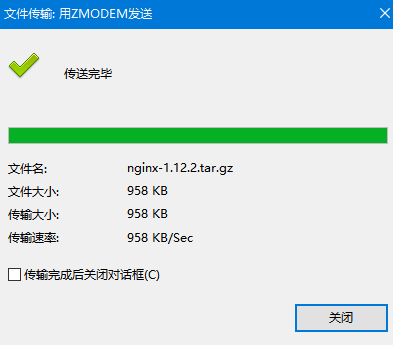
[root@mufeng41 ~]# ll nginx-1.12.2.tar.gz -rw-r--r--. 1 root root 981687 8月 27 2019 nginx-1.12.2.tar.gz [root@mufeng41 ~]# tar xf nginx-1.12.2.tar.gz -C /usr/local/src/
登录并查看
root@mufeng41 ~]# cd !$ cd /usr/local/src/ [root@mufeng41 src]# ls nginx-1.12.2 [root@mufeng41 src]# cd nginx-1.12.2/ [root@mufeng41 nginx-1.12.2]# ls auto CHANGES CHANGES.ru conf configure contrib html LICENSE man README src [root@mufeng41 nginx-1.12.2]#
3.2 开始编译
./configure --prefix=/usr/local/nginx --with-http_dav_module --with-http_stub_status_module --with-http_addition_module --with-http_sub_module --with-http_flv_module --with-http_mp4_module
对参数的解释:
- –with-http_dav_module 启用ngx_http_dav_module支持(增加PUT,DELETE,MKCOL:创建集合,COPY和MOVE方法)默认情况下为关闭,需编译开启
- –with-http_stub_status_module 启用ngx_http_stub_status_module支持(获取nginx自上次启动以来的工作状态)
- –with-http_addition_module 启用ngx_http_addition_module支持(作为一个输出过滤器,支持不完全缓冲,分部分响应请求)
- –with-http_sub_module 启用ngx_http_sub_module支持(允许用一些其他文本替换nginx响应中的一些文本)
- –with-http_flv_module 启用ngx_http_flv_module支持(提供寻求内存使用基于时间的偏移量文件)
- –with-http_mp4_module 启用对mp4文件支持(提供寻求内存使用基于时间的偏移量文件)
3.3 开始编译安装nginx
使用make && make install进行安装
[root@mufeng41 nginx-1.12.2]# make && make install
如何判断是否执行成功?
答: echo $?
3.4 生成运行的nginx用户
[root@mufeng41 nginx-1.12.2]# useradd -u 8000 -s /sbin/nologin nginx [root@mufeng41 nginx-1.12.2]# id nginx uid=8000(nginx) gid=8000(nginx) 组=8000(nginx) [root@mufeng41 nginx-1.12.2]#
3.5 启动nginx并测试
如果你不知道nginx配置文件和启动脚本在哪,可以搜一下,使用find / -name nginx.conf.
启动服务
[root@itlaoxin163 ~]# find / -name nginx.conf /usr/local/nginx/conf/nginx.conf # 启动 [root@mufeng41 nginx-1.12.2]# /usr/local/nginx/sbin/nginx [root@mufeng41 nginx-1.12.2]# netstat -antup |grep 80 tcp 0 0 0.0.0.0:80 0.0.0.0:* LISTEN 25286/nginx: master udp 0 0 0.0.0.0:58076 0.0.0.0:*
查看效果
[root@mufeng41 nginx-1.12.2]# systemctl stop firewalld.service [root@mufeng41 nginx-1.12.2]# curl -I 127.0.0.1 HTTP/1.1 200 OK Server: nginx/1.12.2 Date: Fri, 24 Mar 2023 11:06:29 GMT Content-Type: text/html Content-Length: 612 Last-Modified: Fri, 24 Mar 2023 11:01:53 GMT Connection: keep-alive ETag: "641d8321-264" Accept-Ranges: byte
四. 配置nginx成为分发器
4.1 先备份配置文件
[root@mufeng41 conf]# pwd /usr/local/nginx/conf [root@mufeng41 conf]# cp nginx.conf nginx.conf.bak [root@mufeng41 conf]#
4.2 把nginx设置成分发器,实现动静分离
配置如下图:
配置分发器
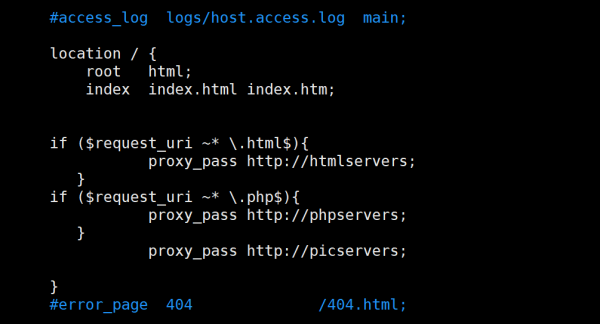
location / { root html; index index.html index.htm; if ($request_uri ~* \.html$){ proxy_pass http://htmlservers; } if ($request_uri ~* \.php$){ proxy_pass http://phpservers; } proxy_pass http://picservers; } 注释:
location 的作用是根据请求的 URI,将请求转发到不同的后端服务器上进行处理。具体解释如下:
- location /:表示所有请求(URI)都会被这个 location 块所匹配。
- root html:表示当访问的 URI对应的文件不存在时,会在 nginx 安装目录下的 html 目录中查找对应的文件。
- index index.html
- index.htm:表示当访问的 URI 对应的目录中没有指定的默认文件时,会尝试访问 index.html 或 index.htm 文件。
- if ($request_uri ~* .html$):表示如果请求的 URI 包含 .html,则执行下面的语句。
- proxy_pass http://htmlservers:表示将请求转发到名为 htmlservers 的后端服务器处理。
- if ($request_uri ~* .php$):表示如果请求的 URI 包含 .php,则执行下面的语句。
- proxy_pass http://phpservers:表示将请求转发到名为 phpservers 的后端服务器处理。
- proxy_pass http://picservers:表示将请求转发到名为 picservers 的后端服务器处理,这个语句没有条件限制,如果以上两个if 语句都不匹配,则会执行这个语句。
接下来设置负载均衡对应的IP
定义负载均衡设备的IP
在nginx配置文件最后一行}前添加一下内容:
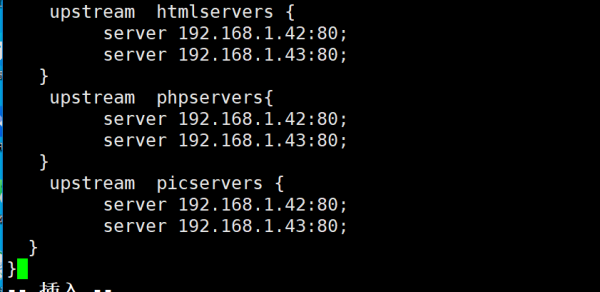
代码如下:
upstream htmlservers { server 192.168.1.42:80; server 192.168.1.43:80; } upstream phpservers{ server 192.168.1.42:80; server 192.168.1.43:80; } upstream picservers { server 192.168.1.42:80; server 192.168.1.43:80; }配置文件是否有错误
[root@mufeng41 conf]# /usr/local/nginx/sbin/nginx -t nginx: the configuration file /usr/local/nginx/conf/nginx.conf syntax is ok nginx: configuration file /usr/local/nginx/conf/nginx.conf test is successful
重启nginx
[root@mufeng41 conf]# /usr/local/nginx/sbin/nginx -s reload
五. 配置两台http服务器
接下来,需要在 mufeng42和mufeng43上操作
5.1 配置mufeng42服务器 配置web服务器:
[root@mufeng42 ~]# yum install httpd php -y
生成静态测试文件
[root@mufeng42 ~]# echo 192.168.1.42 > /var/www/html/index.html
在创建一个php文件:
[root@itlaoxin162 ~]# vim /var/www/html/test.php
写入内容:
echo "我是42服务器";echo "我是沐风晓月"
启动apache
[root@mufeng42 ~]# systemctl restart httpd
5.2 配置mufeng43服务器
安装http并生成静态文件
[root@mufeng43 ~]# yum install httpd php -y [root@mufeng43 ~]# echo 192.168.1.43 > /var/www/html/index.html
建立php文件
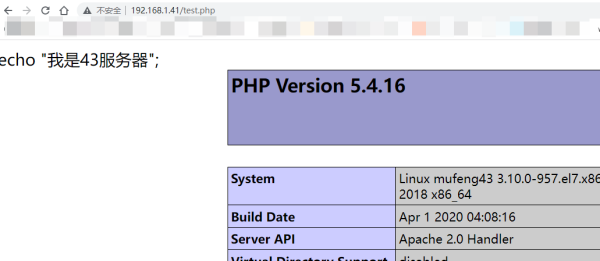
[root@mufeng43 ~]# cd /var/www/html/ [root@mufeng43 html]# vi mufeng.php [root@mufeng43 html]# cat mufeng.php echo "我是43服务器";
启动配置文件
[root@mufeng43 html]# systemctl restart httpd
5.3 测试
到目前为止,nginx负载均衡就结束了,接下来就可以测试了:
测试静态页面
浏览器输入: http://192.168.1.41/ 进行测试


测试转发动态页面:
浏览器输入 http://192.168.1.41/test.php
总结
到此这篇关于利用nginx实现动静分离的负载均衡集群实战的文章就介绍到这了,更多相关nginx负载均衡集群内容请搜索0133技术站以前的文章或继续浏览下面的相关文章希望大家以后多多支持0133技术站!
以上就是利用nginx实现动静分离的负载均衡集群实战教程的详细内容,更多请关注0133技术站其它相关文章!


