Spring Cache是一个框架,实现了基于注解的缓存功能,只需要简单地加一个注解,就能实现缓存功能,这篇文章主要介绍了Spring Cache简介和使用,需要的朋友可以参考下
一、简介
Spring Cache是一个框架,实现了基于注解的缓存功能,只需要简单地加一个注解,就能实现缓存功能。
Spring Cache提供了一层抽象,底层可以切换不同的cache实现。具体就是通过CacheManager接口来统一不同的缓存技术。
CacheManager是Spring提供的各种缓存技术抽象接口
针对不同的缓存技术需要实现不同的CacheManager:

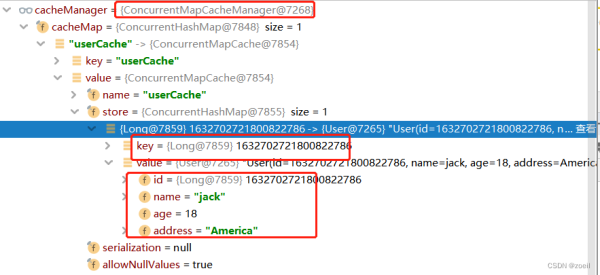
CacheManager默认使用的ConcurrentMapManager
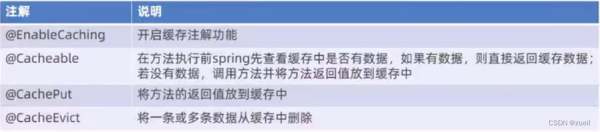
Spring Cache 常用注解
在spring boot项目中,使用缓存技术只需在项目中导入相关缓存技术的依赖包,并在启动类上使用@EnableCaching开启缓存支持即可。
例如,使用Redis作为缓存技术,只需要导入Spring data Redis的maven坐标即可。
org.springframework.boot spring-boot-starter-data-redis
spring cache的基本api在web下的context包中
如果有使用其他的api可以导入cache的依赖
org.springframework.boot spring-boot-starter-cache
二、使用默认ConcurrentMapManager
(一)创建数据库和表
创建cache_demo数据库,并创建user表
> create database cache_demo; Query OK, 1 row affected (0.02 sec) > use cache_demo; Database changed > create table user ( > id bigint primary key, > name varchar(50), > age int, > address varchar(50) >);

(二)创建boot项目
改POM
4.0.0 org.springframework.boot spring-boot-starter-parent 2.4.5 com.itheima cache_demo 1.0-SNAPSHOT 1.8 org.springframework.boot spring-boot-starter-web compile org.projectlombok lombok 1.18.20 com.alibaba fastjson 1.2.76 commons-lang commons-lang 2.6 org.springframework.boot spring-boot-starter-cache mysql mysql-connector-java runtime com.baomidou mybatis-plus-boot-starter 3.4.2 com.alibaba druid-spring-boot-starter 1.1.23 org.springframework.boot spring-boot-maven-plugin 2.4.5
写YML
server: port: 8080 spring: application: #应用的名称,可选 name: cache_demo datasource: druid: driver-class-name: com.mysql.cj.jdbc.Driver url: jdbc:mysql://localhost:3306/cache_demo?serverTimezone=Asia/Shanghai&useUnicode=true&characterEncoding=utf-8&zeroDateTimeBehavior=convertToNull&useSSL=false&allowPublicKeyRetrieval=true username: root password: root mybatis-plus: configuration: #在映射实体或者属性时,将数据库中表名和字段名中的下划线去掉,按照驼峰命名法映射 map-underscore-to-camel-case: true log-impl: org.apache.ibatis.logging.stdout.StdOutImpl global-config: db-config: id-type: ASSIGN_ID
User
@Data public class User implements Serializable { private static final long serialVersionUID = 1L; private Long id; private String name; private int age; private String address; } UserMapper ==================================================== @Mapper public interface UserMapper extends BaseMapper{ } UserController ==================================================== @RestController @RequestMapping("/user") @Slf4j public class UserController { @Autowired private UserService userService; // 增加User @PostMapping public User save(User user){ userService.save(user); return user; } // 删除User @DeleteMapping("/{id}") public void delete(@PathVariable Long id){ userService.removeById(id); } // 更新User @PutMapping public User update(User user){ userService.updateById(user); return user; } // 根据id查询User @GetMapping("/{id}") public User getById(@PathVariable Long id){ User user = userService.getById(id); return user; } // 根据id和name查询User集合 @GetMapping("/list") public List list(User user){ LambdaQueryWrapper queryWrapper = new LambdaQueryWrapper<>(); queryWrapper.eq(user.getId() != null,User::getId,user.getId()); queryWrapper.eq(user.getName() != null,User::getName,user.getName()); List list = userService.list(queryWrapper); return list; } } 主启动类
@Slf4j @SpringBootApplication public class CacheDemoApplication { public static void main(String[] args) { SpringApplication.run(CacheDemoApplication.class,args); log.info("项目启动成功..."); } }(三)使用Api
1、@EnableCaching
启动类上加注解@EnableCaching // 使用spring cache
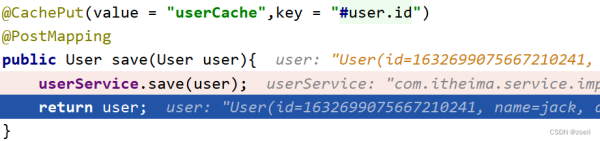
2、@CachePut
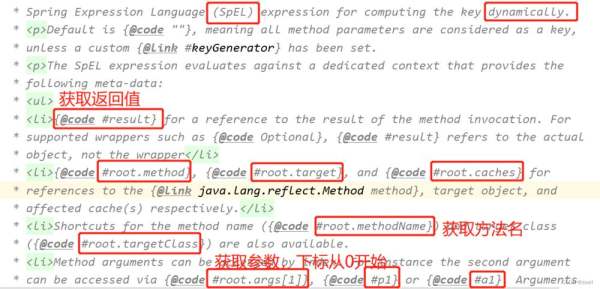
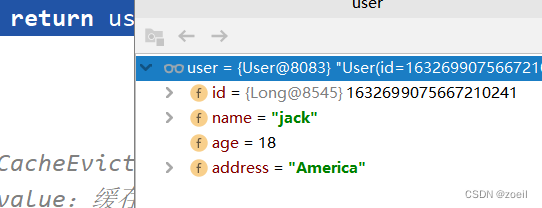
// 在controller中加入缓存对象 @Autowired private CacheManager cacheManager; /** * CachePut:将方法返回值放入缓存 * value:缓存的名称,每个缓存名称下面可以有多个key * key:缓存的key */ @CachePut(value = "userCache",key = "#user.id") @PostMapping public User save(User user){ userService.save(user); return user; }通过ctrl点进key下载源码后我们可以看到这里使用的是SpEL语言动态获取值
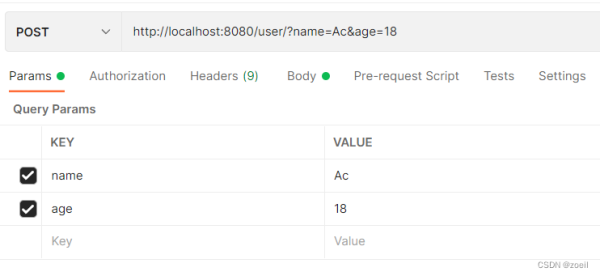
测试,使用 postman 发请求
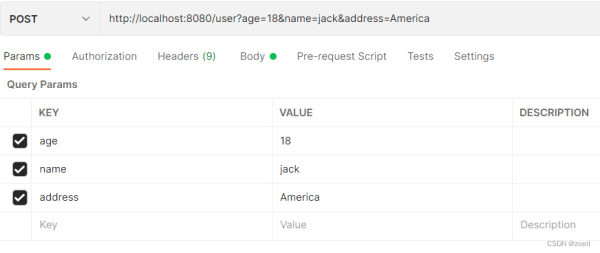
第一次添加会将返回的user存放进cacheManager中
3、@cacheable
在方法执行前spring先查看缓存中是否有数据,如果有数据,则直接返回缓存数据;若没有数据,调用方法并将方法返回值放到缓存中
/** * Cacheable:在方法执行前spring先查看缓存中是否有数据,如果有数据,则直接返回缓存数据;若没有数据,调用方法并将方法返回值放到缓存中 * value:缓存的名称,每个缓存名称下面可以有多个key * key:缓存的key * condition:条件,满足条件时才缓存数据 * unless:满足条件则不缓存 */ @Cacheable(value = "userCache",key = "#id",unless = "#result == null") @GetMapping("/{id}") public User getById(@PathVariable Long id){ User user = userService.getById(id); return user; }测试,我们使用jack的id去查询一下,同样使用postman,在这个方法设置断点,如果没有触发断点说明是在cache中查询直接返回的
4、@CacheEvict
/** * CacheEvict:清理指定缓存 * value:缓存的名称,每个缓存名称下面可以有多个key * key:缓存的key */ @CacheEvict(value = "userCache",key = "#p0") //@CacheEvict(value = "userCache",key = "#root.args[0]") //@CacheEvict(value = "userCache",key = "#id") @DeleteMapping("/{id}") public void delete(@PathVariable Long id){ userService.removeById(id); } //@CacheEvict(value = "userCache",key = "#p0.id") //@CacheEvict(value = "userCache",key = "#user.id") //@CacheEvict(value = "userCache",key = "#root.args[0].id") @CacheEvict(value = "userCache",key = "#result.id") @PutMapping public User update(User user){ userService.updateById(user); return user; }三、使用redis作为cache
导入redis依赖
org.springframework.boot spring-boot-starter-data-redis
修改YML
server: port: 8080 spring: application: #应用的名称,可选 name: cache_demo datasource: druid: driver-class-name: com.mysql.cj.jdbc.Driver url: jdbc:mysql://localhost:3306/cache_demo?serverTimezone=Asia/Shanghai&useUnicode=true&characterEncoding=utf-8&zeroDateTimeBehavior=convertToNull&useSSL=false&allowPublicKeyRetrieval=true username: root password: 123456 redis: host: 192.168.23.100 port: 6379 password: zjy123...000 database: 1 cache: redis: time-to-live: 1800000 #设置缓存过期时间,可选 mybatis-plus: configuration: #在映射实体或者属性时,将数据库中表名和字段名中的下划线去掉,按照驼峰命名法映射 map-underscore-to-camel-case: true log-impl: org.apache.ibatis.logging.stdout.StdOutImpl global-config: db-config: id-type: ASSIGN_ID
启动项目后,cache变成了RedisCacheManager

使用postman发送save请求
db01
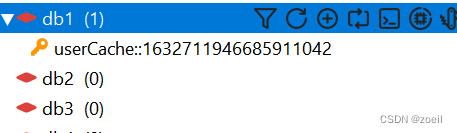
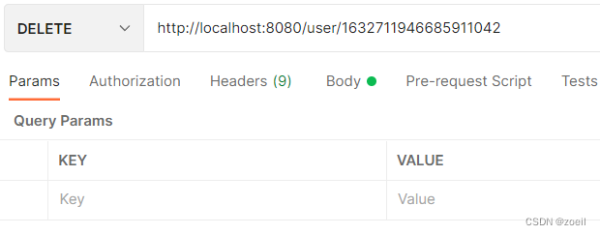
发送DELETE删除缓存

到此这篇关于Spring Cache简单介绍和使用的文章就介绍到这了,更多相关Spring Cache使用内容请搜索0133技术站以前的文章或继续浏览下面的相关文章希望大家以后多多支持0133技术站!
以上就是Spring Cache简单介绍和使用大全的详细内容,更多请关注0133技术站其它相关文章!


