这篇文章主要为大家介绍了使用JS 简单实现滑块验证码示例详解,有需要的朋友可以借鉴参考下,希望能够有所帮助,祝大家多多进步,早日升职加薪
开篇:
拖动底部滑块,实现滑块验证码功能
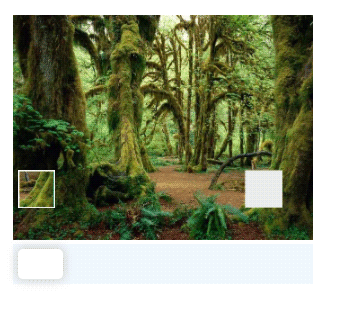
一、实现效果
style
*{ margin: 0; padding: 0; } .main { position: relative; margin-left: 20px; margin-top: 20px; width: 300px; background-color: white; } .content { width: 100%; } .content img { width: 100%; height: auto; } #slider { width: 100%; height: 40px; background-color: aliceblue; position: relative; } #smallImage { position: absolute; top: 0; left: 0; width: 30px; } #sliderBlock{ position: absolute; left: 5px; height: 30px; width: 45px; top: 5px; background-color: white; border-radius: 5px; box-shadow: 0 0 10px 2px lightgray; }Script
class SlidingVerification { // 鼠标左键是否按下 isMouseDown // 鼠标按下x值 mouseDownStartX // 鼠标移动距离 mouseMoveLength // 准确的x位置 correctX // 图片 imageBase64 constructor(imageBase64){ this.setCurrentImageBase64(imageBase64) this.getImageData() this.bindMouseEvent() } // 设置当前图片 setCurrentImageBase64(imageBase64){ this.imageBase64 = imageBase64 document.getElementById('backImage').src = imageBase64 } // 绑定鼠标事件 bindMouseEvent(){ document.onmousemove = (event)=>{ if(this.isMouseDown){ this.mouseMoveLength = event.clientX - this.mouseDownStartX if(this.mouseMoveLength + 5 > 0 && this.mouseMoveLength + 5 { let { top,left,width,height} = this.getElementPosition(document.getElementById('sliderBlock')) if(event.clientX > left && event.clientX <(left + width) && event.clientY > top && event.clientY <(top + height)){ this.isMouseDown = true this.mouseDownStartX = event.clientX } } //鼠标抬起事件 document.onmouseup = ()=>{ if(this.isMouseDown){ this.isMouseDown = false this.checkVerificatonIsCorrect() } } } // 检测拼图是否对接完成 checkVerificatonIsCorrect(){ if(this.correctX && this.correctX){ let backColor = ((Math.abs(this.correctX - (this.mouseMoveLength + 5)) <5)) ? 'rgb(146,190,70)' : 'rgba(205,64,74)' document.getElementById('slider').style.background = backColor setTimeout(()=>{ document.getElementById('slider').style.background = 'aliceblue' document.getElementById('smallImage').style.left = 5 + 'px' document.getElementById('sliderBlock').style.left = 5 + 'px' },1000) } } // dom在浏览器的位置 getElementPosition(element){ let top = element.offsetTop let left = element.offsetLeft let width = element.offsetWidth let height = element.offsetHeight var currentParent = element.offsetParent; while (currentParent !== null) { top += currentParent.offsetTop left += currentParent.offsetLeft currentParent = currentParent.offsetParent } return {top,left,width,height} } // 获取图片 async getImageData(){ var image = new Image(); image.src = this.imageBase64 await new Promise((resolve)=>{ image.onload = resolve }) let width = image.width let height = image.height let canvas = document.createElement('canvas') canvas.setAttribute('width',`${width}px`) canvas.setAttribute('height',`${height}px`) var ctx = canvas.getContext("2d") ctx.drawImage(image,0,0,width,height) this.shrinkUrl = canvas.toDataURL('image/jpeg',1) try { //保存像素 let originalPiexls = ctx.getImageData(0,0,width,height) this.drawImage(originalPiexls,width,height) } catch (error) { console.log(error) } } // 缺失的区域 getNotchArea(width,height){ let notchAreaWidth = parseInt(width / 8.0) let notchAreaHeight = notchAreaWidth let notchAreaX = parseInt(Math.random() * ((width - notchAreaWidth) - (notchAreaWidth * 2)) + notchAreaWidth * 2) this.correctX = (notchAreaX / width) * document.getElementById('backImage').offsetWidth let notchAreaY = parseInt(Math.random() * ((height - notchAreaHeight) - 60) + 60) document.getElementById('smallImage').style.top = (notchAreaY / height) * document.getElementById('backImage').offsetHeight + 'px' document.getElementById('smallImage').style.left = 5 + 'px' document.getElementById('smallImage').style.width = (notchAreaWidth / width) * document.getElementById('backImage').offsetWidth + 'px' return { notchAreaX,notchAreaY,notchAreaWidth,notchAreaHeight } } // 绘制图片 drawImage(originalPiexls,width,height){ if(!originalPiexls || !originalPiexls.data || originalPiexls.data.length == 0){ throw('像素为空') } let { notchAreaX,notchAreaY,notchAreaWidth,notchAreaHeight } = this.getNotchArea(width,height) let notchAreaPixels = new Uint8ClampedArray(notchAreaWidth * notchAreaHeight * 4) let startY = notchAreaY let endY = notchAreaY + notchAreaHeight let startX = notchAreaX * 4 let endX = (notchAreaX + notchAreaWidth) * 4 let currentSmallIndex = 0 for(let y = startY;y 二、总结与思考
图片是由操作像素点绘制的,直接生成了两张图片,一个是缺口小图,一个残缺大图,因为缺口的位置是随机的,缺口的形状也可以自定义,因此并没有用 CSS 去处理图片的,反而用像素的话感觉可操作性更高。
对鼠标左键按下跟抬起事件进行了监听,只有当点击区域在滑块内才会触发鼠标滑动监听的事件回调处理。
以上就是JS 简单实现滑块验证码的详细内容,更多关于JS 实现滑块验证码的资料请关注0133技术站其它相关文章!
以上就是JS 简单实现滑块验证码的详细内容,更多请关注0133技术站其它相关文章!


