这篇文章主要为大家详细介绍了微信小程序scroll-view实现左右联动效果,文中示例代码介绍的非常详细,具有一定的参考价值,感兴趣的小伙伴们可以参考一下
微信小程序利用scroll-view实现左右联动,供大家参考,具体内容如下
点击左边的按钮时,右边可以跳动到指定的位置
- 首先要注意使用scroll-view竖屏滚动,需要给scroll-view固定高度
- 其次在点击时,需要给需要滚动的scroll-view加上scroll-into-view,其值应该是子元素的id,且id不能以数字 开头
滚动右边,左边菜单跳到相应的位置
- 其实现的思想是,在右边滚动屏滚动时,得到滚动的距离。将右边滚动屏中各模块到达顶部的距离计算出来放到一个数组中。第一个模块的滚动距离是本身的高度,第二个模块的滚动距离是第一个模块的高度加上自身的高度,以此类推。滚动时,判断滚动距离在保存好的数组中的哪个阶段,并以此得出符合条件的下标值,将左侧菜单对应的下标中的值做改动,就可以实现左右联动。
- 计算各模块的高度时,获取元素需要使用wx.createSelectorQuery(),其返回selectorQuerys对象实例;再利用返回来的节点的boundingClientRect(function callback)方法获取节点的布局位置信息,在SelectorQuery.exec()执行后,将信息返回在回调函数中。本文中将获取元素高度的方法写在了onload中。
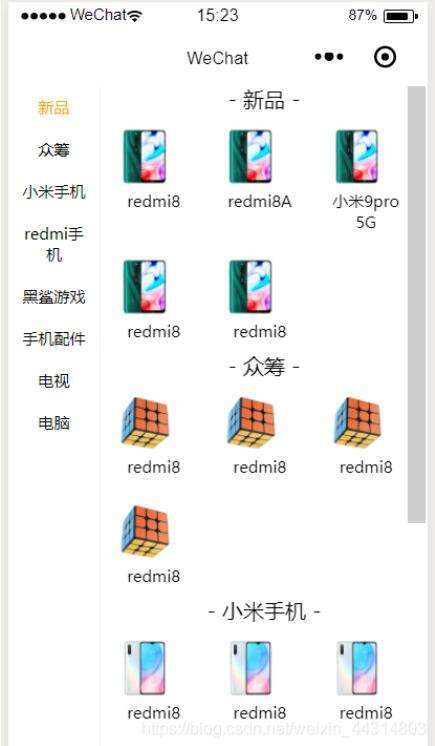
实现效果图:
主要代码如下:
index.wxml
{{item.name}} {{item.title}} {{i.text}}
index.js
//index.js //获取应用实例 const app = getApp() Page({ data: { toView: 'a1', activeId: 'a1', category: [ {name: '新品', id: 'a1'}, { name: '众筹', id: 'a2' }, { name: '小米手机', id: 'a3' }, { name: 'redmi手机', id: 'a4' }, { name: '黑鲨游戏', id: 'a5' }, { name: "手机配件", id: 'a6' }, { name: '电视', id: 'a7'}, { name: '电脑', id: 'a8' }, ], content: [ { title: '- 新品 -', options: [ { src: '../../image/redmi.png-600',id: '001',text: 'redmi8'}, { src: '../../image/redmi.png-600', id: '002', text: 'redmi8A' }, { src: '../../image/redmi.png-600', id: '003', text: '小米9pro 5G'}, { src: '../../image/redmi.png-600', id: '004', text: 'redmi8'}, { src: '../../image/redmi.png-600', id: '005',text: 'redmi8' } ], id: 'a1' }, { title: '- 众筹 -', options: [ { src: '../../image/zhongchou.png-600', id: '006', text: 'redmi8' }, { src: '../../image/zhongchou.png-600', id: '007' ,text: 'redmi8'}, { src: '../../image/zhongchou.png-600', id: '008', text: 'redmi8' }, { src: '../../image/zhongchou.png-600', id: '009',text: 'redmi8' } ], id: 'a2' }, { title: '- 小米手机 -', options: [ { src: '../../image/xiaomi.png-600', id: '006', text: 'redmi8' }, { src: '../../image/xiaomi.png-600', id: '007', text: 'redmi8' }, { src: '../../image/xiaomi.png-600', id: '008', text: 'redmi8' }, { src: '../../image/xiaomi.png-600', id: '009', text: 'redmi8' } ], id: 'a3' }, { title: '- redmi手机 -', options: [ { src: '../../image/hongmi.png-600', id: '006', text: 'redmi8' }, { src: '../../image/hongmi.png-600', id: '007', text: 'redmi8' }, { src: '../../image/hongmi.png-600', id: '008', text: 'redmi8' }, { src: '../../image/hongmi.png-600', id: '009', text: 'redmi8' } ], id: 'a4' } ], }, //事件处理函数 onLoad: function () { this.setData({ toView: 'a1', heightArr: [] }) let query = wx.createSelectorQuery(); query.selectAll('.catefory-main').boundingClientRect((rect)=> { rect.forEach(ele => { this.calculateHeight(ele.height); }) }).exec(); }, clickItem(e) { this.setData({ activeId: e.currentTarget.dataset.id, toView: e.currentTarget.dataset.id }) }, scroll(e) { let scrollHeight = e.detail.scrollTop; let index = this.calculateIndex(this.data.heightArr,scrollHeight); this.setData({ activeId: 'a'+index }) }, // 计算滚动的区间 calculateHeight(height) { if(!this.data.heightArr.length) { this.data.heightArr.push(height) }else { this.data.heightArr.forEach(ele => { height += ele }) this.data.heightArr.push(height); } }, // 计算左边选中的下标 calculateIndex(arr, scrollHeight) { let index= ''; for(let i =0;i= 0 && scrollHeight = arr[i-1] && scrollHeight index.wxss
/**index.wxss**/ .container { padding: 0; width:100%; height: 100vh; display: flex; flex-direction: row; align-items: flex-start; } .category-left { height: 100%; width: 22%; padding: 0 20rpx; box-sizing: border-box; border-right: 1px solid #efefef; } .catgegory-item { padding: 20rpx 0; font-size: 30rpx; text-align: center; } .active-item { color: orange; } .category-right { flex:1; height: 100%; } .category-content { display: grid; grid-template-columns: repeat(auto-fill, 190rpx); } .category-title { text-align: center; } .content-item { display: flex; flex-direction: column; padding: 20rpx; text-align: center; font-size: 30rpx; } .content-item image{ width: 120rpx; height: 120rpx; }以上就是本文的全部内容,希望对大家的学习有所帮助,也希望大家多多支持0133技术站。
以上就是微信小程序scroll-view实现左右联动效果的详细内容,更多请关注0133技术站其它相关文章!


