这篇文章主要介绍了CocosCreator制作射击游戏,各个方面都讲的比较详细,希望同学们自己动手试一下
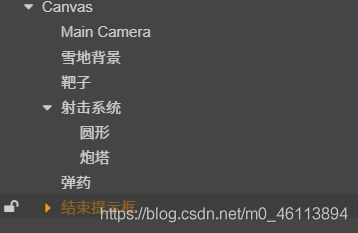
场景布置
游戏资源


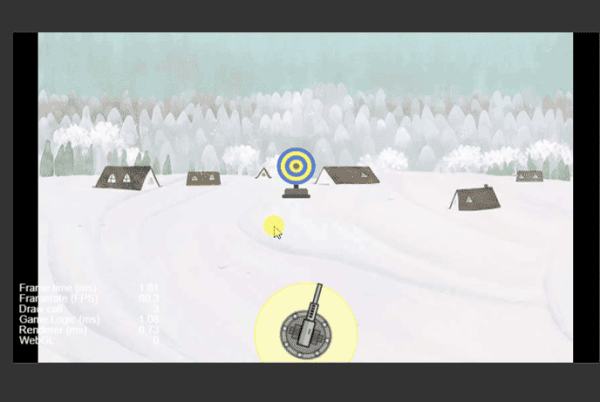
炮塔旋转
机制与之前手柄实例的小车相同,使用touchmove监听触摸事件,
- 获取触摸位置
- 通过位置用signAngle方法将该位置与cc.v2(1,0)位置的角度差求出(记得要加负号,比较所得逆时针为负,赋值angle逆指针为正)。
- 所求的的角度即为最终角度。
onLoad(){ //初始化为90度 this.node.angle=90; this.node.on('touchstart',this.onTouchStart,this); this.node.on('touchmove',this.onTouchMove,this); this.node.on('touchend',this.onTouchEnd,this); this.node.on('touchconcel',this.onTouchConcel,this); } onTouchStart(e:cc.Event.EventTouch){ //获取开始的位置 this.starPos=this.node.parent.convertToNodeSpace(e.getLocation()); //获取炮口的初始角度 this.starAngle=this.node.angle; } onTouchEnd(e:cc.Event.EventTouch){ } onTouchMove(e:cc.Event.EventTouch){ //获取触点当前的位置 let pos:cc.Vec2=this.node.parent.convertToNodeSpace(e.getLocation()); //获取角度 //angle顺时针为负逆时针为正 let sweep_radian=pos.signAngle(this.starPos);//pos相对于starPose的角度p相对s顺时针为正 let sweep_angle=sweep_radian*180/Math.PI;//弧度制换算角度 //让炮塔的角度指向最终的角度 let angle=this.starAngle-sweep_angle; //将角度限制在45~135之间 if(angle<45)angle=45; if(angle>135)angle=135; cc.log("炮口摆动:"+sweep_angle+"最终角度位置:"+angle); this.node.angle=angle; }动态生成子弹

- 生成节点cc.Node,并增加组件addComponent(cc.Sprite)
- 为组件的属性赋值,将图片的spriteFrame赋值
- 将组件挂载在一个父节点下
- 设置位置、角度等
- 控制其运动可以导入新建的脚本,并将该脚本增加到动态生成节点的组件中
onTouchEnd(e:cc.Event.EventTouch){ this.fire(); } onTouchConcel(e:cc.Event.EventTouch){ } fire(){ if(this.bulleteicon==null)return; let bullet:cc.Node=new cc.Node(); let sprite:cc.Sprite=bullet.addComponent(cc.Sprite); sprite.spriteFrame=this.bulleteicon; //挂载到射击系统节点下 bullet.parent=this.node.parent; //设置相对父节点位置 let ration=this.node.angle*Math.PI/180; let direction=cc.v2(Math.cos(ration),Math.sin(ration)); bullet.angle=this.node.angle; let r=100; bullet.setPosition(cc.v3(r*direction.x,r*direction.y,0)); //附加脚本组件 let script=bullet.addComponent(Buletet); script.explodeImg=this.explodeImg; script.direction=direction; } start () { this.schedule(this.onTimer,0.01); } onTimer(){ if(this.node.y>300){ this.unschedule(this.onTimer); this.explode(); return; } let dx=this.direction.x*5; let dy=this.direction.y*5; this.node.y+=dy; this.node.x+=dx; } explode(){ let sp:cc.Sprite=this.getComponent(cc.Sprite); sp.spriteFrame=this.explodeImg; //将子弹缩小 this.node.scale=0.1; //爆炸动画效果缓动系统 let self=this; cc.tween(this.node) .to(0.5,{scale:1,opacity:0}) .call(function(){ self.afterExplode(); }) .start(); } afterExplode(){ this.node.destroy(); }本次bug:
- 导入的类名与文件名不同, 注意重命名文件不会自动修改代码中的类名,需要修改两次
- setposition()方法使用时参数写在了cc.v3的构造函数内,一定注意参数的位置
碰撞计算

计算子弹和靶标的相对位置,若小于范围,则判断为命中靶,执行命中的操作,否则判断为没有命中,执行没有命中的操作。
脚本需传入靶子节点,增加target属性
@property(cc.SpriteFrame) explodeImg: cc.SpriteFrame = null; direction: cc.Vec2 = null; target: cc.Node = null; onLoad() { } start() { this.schedule(this.onTimer, 0.01); } onTimer() { if (this.node.y > 350) { if (this.isHit()) { //播放爆炸效果 this.explode(); console.log("命中靶"); } else { console.log("脱靶"); this.disMiss(); } this.unschedule(this.onTimer); return; } let dx = this.direction.x * 5; let dy = this.direction.y * 5; this.node.y += dy; this.node.x += dx; } //判断是否命中 isHit(): boolean { let targetPos: cc.Vec2 = this.geWorldLocation(this.target); let selfPos: cc.Vec2 = this.geWorldLocation(this.node); let distance = Math.abs(targetPos.x - selfPos.x); console.log("靶标x=" + targetPos.x + " , 子弹x=" + selfPos.x); if (distance <50) { return true; } else { return false; } } explode() { let sp: cc.Sprite = this.getComponent(cc.Sprite); sp.spriteFrame = this.explodeImg; //将子弹缩小 this.node.scale = 0.1; //爆炸动画效果缓动系统 let self = this; cc.tween(this.node) .to(0.5, { scale: 1, opacity: 0 }) .call(function () { self.disMiss(); }) .start(); } geWorldLocation(node: cc.Node): cc.Vec2 { let pos = node.getPosition(); //注意这里是node.parent。方法的调用者要是当前节点的坐标系 return node.parent.convertToWorldSpaceAR(pos); } disMiss() { this.node.destroy(); }本次bug:
获取世界坐标时,没有调用其父节点的坐标系,用了当前节点的坐标系,所以返回的依然是自身当前坐标系的值。记得转换世界坐标的方法调用者是当前节点的坐标系,一般为其父节点 return node.parent.convertToWorldSpaceAR(pos);(以锚点为原点)
增加效果

在靶子的节点下增加脚本,控制移动,左右来回移动
同时,当子弹命中后增加文字提示效果。
文字提示:
cheer() { //创建节点并挂载 let node: cc.Node = new cc.Node(); node.parent = this.node.parent;//两者同一级,同一个父对象 let label: cc.Label = node.addComponent(cc.Label); label.string = "+10分"; //设置位置、透明度等 node.setPosition(cc.v3(0, 250, 0)); node.opacity = 200; node.color = new cc.Color(255, 0, 0); //动效 cc.tween(node) .to(0.5, { scale: 1.5 }) .to(0.2, { opacity: 0 }) .call(function () { node.destroy(); }) .start(); } 靶子移动
update (dt) { let speed=3; if(this.isLeft){ speed=-speed; } this.node.x+=speed; if(this.isLeft&&this.node.x<-350){ this.isLeft=false; } if(!this.isLeft&&this.node.x>350){ this.isLeft=true; } }增加弹药库的显示
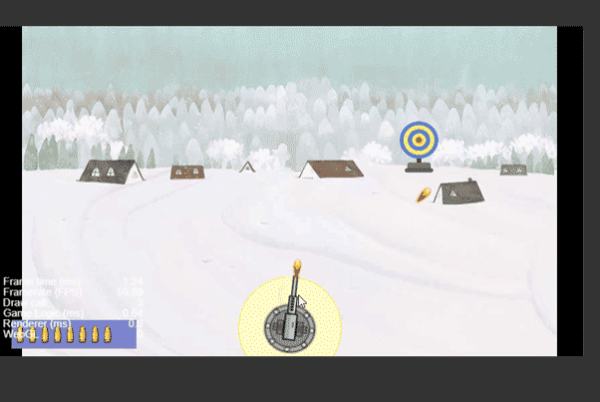
- 增加弹药库节点,批量生成子弹图片(可用widget组件设置位置)
- 增加减少子弹方法,并通过设置子弹图片的active属性来减少子弹。
- 在炮塔的fire方法中调用减少子弹的方法
调用方法有两种,一种为在炮塔脚本中获取弹药库节点在调用,另一种为设置公共类,(静态变量),在onLoad()方法中就初始化该节点,然后直接调用。用后者。
@property(cc.SpriteFrame) bulleteIcon: cc.SpriteFrame = null; capacity: number = 10; stockNumber: number = 10; onLoad() { let space: number = this.node.width / this.capacity; for (let i = 0; i =this.stockNumber){ nodes[i].active=false; } } } Common公共类
//静态类,全局变量,将所有会公用的变量、类定义在Common类中 static ammo:Ammo=null; onLoad() { Common.ammo=cc.find('Canvas/弹药').getComponent('Ammo'); console.log(Common.ammo); } 此处bug:
cc.find()方法中记得用除法的斜杠。
子弹耗尽提示分数

- 创建遮罩层,将脚本类导入到Common类中,设置active属性为false
- 在ResultDialog脚本 增加show方法,让其active属性变为true同时将分数显示在屏幕上。
- 在Bullete(控制子弹运动脚本)中判断子弹数量是否<=0,并调用Common中show方法显示分数提示框。
ResultDialog脚本(控制分数提示框)
onLoad () { let replay:cc.Node=cc.find('Canvas/结束提示框/再玩一局'); console.log(replay); replay.on('touchstart',this.dismiss,this); this.node.on('touchstart',this.onTouchdisable,this); this.node.on('touchmove',this.onTouchdisable,this); this.node.on('touchend',this.onTouchdisable,this); } //显示提示框 show(){ this.node.active=true; let scoreNode : cc.Node = cc.find('分数框/分数', this.node); let scoreLabel : cc.Label = scoreNode.getComponent(cc.Label); scoreLabel.string = Common.score + '分'; } //隐藏提示框 dismiss(){ this.node.active=false; } //遮罩显示时屏蔽 onTouchdisable(e:cc.Event.EventTouch){ e.stopPropagation(); } start () { } Common脚本
//静态类,全局变量,将所有会公用的变量、类定义在Common类中 static ammo:Ammo=null; static score : number = 0; static resultdialog : ResultDialog = null; onLoad() { Common.resultdialog=cc.find('Canvas/结束提示框').getComponent('ResultDialog'); Common.ammo=cc.find('Canvas/弹药').getComponent('Ammo'); }在Bullete方法中增加分数增加
if (this.isHit()) { //播放爆炸效果 this.explode(); //显示+10分 this.cheer(); //总分数+10 Common.score += 10; console.log("命中靶"); }游戏重开

该小游戏比较简单,重开只需要重置弹药库节点即可,因此reset方法放在Ammo脚本中
在公共类中创建Ammo对象,设置静态方法,重置得分、以及调用Ammo的reset方法。
Ammo(弹药库类)脚本添加
reset(){ this.stockNumber=this.capacity; this.display(); }更改Common脚本
//静态类,全局变量,将所有会公用的变量、类定义在Common类中 static ammo:Ammo=null; static score : number = 0; static resultdialog : ResultDialog = null; onLoad() { Common.resultdialog=cc.find('Canvas/结束提示框').getComponent('ResultDialog'); Common.ammo=cc.find('Canvas/弹药').getComponent('Ammo'); console.log(Common.ammo); } static resetGame() { Common.score=0; Common.ammo.reset(); } 增加一些细节

增加游戏声音以及炮塔激活的变化
1.炮塔脚本增加属性
//音效 @property(cc.AudioClip) audioFire: cc.AudioClip = null; @property(cc.AudioClip) audioExplode: cc.AudioClip = null; //炮塔图片 @property(cc.SpriteFrame) iconNormal: cc.SpriteFrame = null; @property(cc.SpriteFrame) iconActive: cc.SpriteFrame = null;
图片切换
onTouchStart(e: cc.Event.EventTouch) {方法最后添加 //炮塔图片切换至激活 this.node.getComponent(cc.Sprite).spriteFrame = this.iconActive; onTouchEnd(e: cc.Event.EventTouch) {方法最后添加 //图片恢复 this.node.getComponent(cc.Sprite).spriteFrame = this.iconNormal; }音效播放
fire(){ 方法后添加 //将子弹爆炸音频传送至子弹脚本 script.audioExplode = this.audioExplode; if (this.audioFire != null) { cc.audioEngine.play(this.audioFire, false, 1); } }播放音频的方法:==cc.audioEngine.play(this.audioFire, false, 1);==第二个参数为是否循环播放,第三个参数为音量大小
子弹脚本
//添加属性 @property(cc.SpriteFrame) explodeImg: cc.SpriteFrame = null; 在判断子弹命中靶子的操作后添加 if(this.audioExplode!=null){ cc.audioEngine.play(this.audioExplode,false,1); }以上就是详解CocosCreator制作射击游戏的详细内容,更多请关注0133技术站其它相关文章!


