这篇文章主要为大家详细介绍了Android自定义彩色织带分割线的相关资料,具有一定的参考价值,感兴趣的小伙伴们可以参考一下
前言
最近开发的一个产品需要涉及到订单,订单页涉及到了一个UI元素,类似饿了么的订单页以及支付宝口碑外卖订单页的彩带(通俗点讲就是一条两种颜色相间而成的分割线):


可以看到,风格基本都是以两种颜色为主相间拼接,至于长度则完全由屏幕宽度来决定,因此如果想要通过设计成图片素材来作为ImageView的背景的方式实现的话,效果并不理想,因为图片的宽度完全无法确定。所以本文通过自定义View的方式,绘制出这样一个彩带的效果。
实现
1.Android中如何绘制四边形
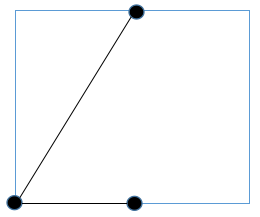
public class ColourLineView extends View{ public ColourLineView(Context context) { super(context, null); } public ColourLineView(Context context, AttributeSet attrs) { super(context, attrs, 0); } public ColourLineView(Context context, AttributeSet attrs, int defStyleAttr) { super(context, attrs, defStyleAttr); } @Override protected void onDraw(Canvas canvas) { super.onDraw(canvas); int width = getWidth(); int height = getHeight(); Path path = new Path(); canvas.save(); path.reset();//重置路径 path.moveTo(width/2, 0);//左上点 path.lineTo(0, height);//左下点 path.lineTo(width-width/2, height);//右下点 path.lineTo(width, 0);//右上点 canvas.clipPath(path);//截取路径所绘制的图形 canvas.drawColor(Color.RED); path.reset();//重置路径,准备绘制第三种颜色的平行四边形 canvas.restore(); } } 主要看onDraw方法,可以看到首先获取View的宽和高,然后建立路径对象path,接着先将path的起点移动到(控件宽的二分之一处,0)处:

接着由该点向(0, 控件高)处绘制一条直线:

接着由(0, 控件高)向(控件宽的二分之一处,高度)绘制一条直线:
接着由(控件宽的二分之一处,高度)向(控件宽, 0)绘制一条直线:

路径绘制完毕,调用clipPath将路径的图形剪出来,便成了一个平行四边形,再给它填充个颜色。
在布局文件中使用一下:
效果如图:
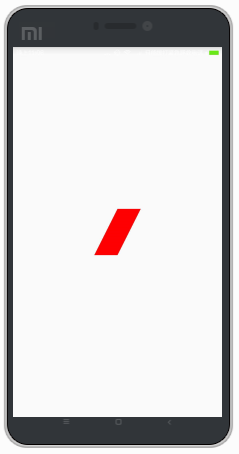
平行四边形的效果就出来了,了解了如何绘制平行四边形,也就相当于写好了砖块,砌成墙自然就不是事了。
2.绘制彩色分割线
首先,我们这个View可以定义的东西应该有如下这几点:
1.可以自定义每个颜色块的大小
2.可以自定义两种颜色
3.可以自定义颜色块之间的间隔
4.平行四边形颜色块倾斜的程度
5.背景色
下面着手来实现这个效果
首先定义一下属性,在attrs.xml中加入如下:
自定义View代码:
** * Created by IT_ZJYANG on 2017/2/9. */ public class ColourLineView extends View{ //线条高度 private float line_height; //每个颜色块的宽度 private float item_width; //每两个颜色快之间的间距 private float separation_width; //平行四边形倾斜的程度 private float lean_degree; //第一种颜色块的颜色 private int first_color; //第二种颜色块的颜色 private int second_color; //线条底色 private int canvas_color; public ColourLineView(Context context) { super(context, null); } public ColourLineView(Context context, AttributeSet attrs) { super(context, attrs); initAttr(context, attrs); } public ColourLineView(Context context, AttributeSet attrs, int defStyleAttr) { super(context, attrs, defStyleAttr); initAttr(context, attrs); } public void initAttr(Context context, AttributeSet attrs){ TypedArray typedArray = context.obtainStyledAttributes(attrs, R.styleable.ColourLineView); line_height = typedArray.getDimension(R.styleable.ColourLineView_line_height, 20); item_width = typedArray.getDimension(R.styleable.ColourLineView_item_width, 20); separation_width = typedArray.getDimension(R.styleable.ColourLineView_separation_width, 20); lean_degree = typedArray.getDimension(R.styleable.ColourLineView_lean_degree, 5); first_color = typedArray.getColor(R.styleable.ColourLineView_first_color, Color.RED); second_color = typedArray.getColor(R.styleable.ColourLineView_second_color, Color.GREEN); canvas_color = typedArray.getColor(R.styleable.ColourLineView_canvas_color, Color.WHITE); typedArray.recycle(); } @Override protected void onDraw(Canvas canvas) { super.onDraw(canvas); Path path = new Path(); int lineWidth = getWidth(); int lineHeight = getHeight(); int count = (item_width + separation_width == 0) ? 0 : lineWidth / (int) (item_width + separation_width) + 1; for(int i=0; i 其中,initAttr方法就不多说了,就是单纯的获取attr里面的属性值,关键看onDraw中的代码,我们要实现多个平行四边形间隔着绘制,那首先需要计算出有多少个平行四边形,将每一个【颜色块+间距】作为一个小部分,然后以整体的宽度/【颜色块+间距】得出有多少个,然后通过for循环绘制出每一个Item,关键在于如何定位平行四边形的四个端点,下面举个例子说明一下思路:
当i = 0,也就是第一个颜色块,那么其左上角一定是(lean_degree,0),左下角为(0,line_height),右上角肯定是左上角+颜色块宽度,所以为(lean_degree+item_width, 0),同理右下角肯定是左下角+颜色块宽度,所以为(item_width, line_height)。
当i = 1,也就是第二个颜色块,此时需要注意,左上角需要在刚才第一个的基础上加上第一个【颜色块+间距】的值,也就是(lean_degree+ (item_width + separation_width) *1,0),左下角则为((item_width + separation_width) *1,line_height),右下和右上同理只是在左上左下的基础上加上item_width。
.............
.............
.............
当i = i时,四个点也就成了:
(lean_degree + (item_width + separation_width) * i , 0)
((item_width + separation_width) * i , lineHeight)
(item_width * (i + 1) + separation_width * i , lineHeight)
(lean_degree + item_width * (i + 1) + separation_width * i , 0)
然后再根据奇偶性判断,让两种颜色间隔绘制,完成。
使用
可以看到高度设置为5dp,每个颜色块宽度为15dp,底色为白色,两个颜色块使用两种不同的颜色,效果如下:

以上就是本文的全部内容,希望对大家的学习有所帮助,也希望大家多多支持html中文网。
以上就是Android自定义彩色织带分割线的详细内容,更多请关注0133技术站其它相关文章!


