这篇文章主要为大家详细研究了iOS10 推送的最新特性,推送内容更加丰富,感兴趣的小伙伴们可以参考一下
最近在研究iOS10关于推送的新特性, 相比之前确实做了很大的改变,总结起来主要是以下几点:
1.推送内容更加丰富,由之前的alert 到现在的title, subtitle, body
2.推送统一由trigger触发
3.可以为推送增加附件,如图片、音频、视频,这就使推送内容更加丰富多彩
4.可以方便的更新推送内容
import 新框架
添加新的框架 UserNotifications.framework

#import
注册推送
在设置通知的时候,需要先进行注册,获取授权
iOS10 所有通知都是通过UNUserNotificationCenter来管理,包括远程通知和本地通知
//iOS8以下 [application registerForRemoteNotificationTypes:UIRemoteNotificationTypeBadge | UIRemoteNotificationTypeAlert | UIRemoteNotificationTypeSound]; //iOS8 - iOS10 [application registerUserNotificationSettings:[UIUserNotificationSettings settingsForTypes:UIUserNotificationTypeAlert | UIUserNotificationTypeSound | UIUserNotificationTypeBadge categories:nil]]; //iOS10 UNUserNotificationCenter *center = [UNUserNotificationCenter currentNotificationCenter]; [center requestAuthorizationWithOptions:(UNAuthorizationOptionAlert | UNAuthorizationOptionBadge | UNAuthorizationOptionSound) completionHandler:^(BOOL granted, NSError * _Nullable error) { } 获取用户设置
iOS10 提供了获取用户授权相关设置信息的接口getNotificationSettingsWithCompletionHandler: , 回调带有一个UNNotificationSettings对象,它具有以下属性,可以准确获取各种授权信息
authorizationStatus
soundSetting
badgeSetting
alertSetting
notificationCenterSetting
lockScreenSetting
carPlaySetting
alertStyle
像下面的方法,点击allow

UNUserNotificationCenter *center = [UNUserNotificationCenter currentNotificationCenter]; [center requestAuthorizationWithOptions:(UNAuthorizationOptionAlert | UNAuthorizationOptionBadge | UNAuthorizationOptionSound) completionHandler:^(BOOL granted, NSError * _Nullable error) { if (granted) { //点击允许 NSLog(@"注册通知成功"); [center getNotificationSettingsWithCompletionHandler:^(UNNotificationSettings * _Nonnull settings) { NSLog(@"%@", settings); }]; } else { //点击不允许 NSLog(@"注册通知失败"); } }];打印信息: *
注册APNS, 获取token
iOS10, 注册APNS和获取token的方法还和之前一样
在application: didFinishLaunchingWithOptions:调用 registerForRemoteNotifications方法
[[UIApplication sharedApplication] registerForRemoteNotifications];
在代理方法application: didRegisterForRemoteNotificationsWithDeviceToken:中获取token
- (void)application:(UIApplication *)application didRegisterForRemoteNotificationsWithDeviceToken:(NSData *)deviceToken NS_AVAILABLE_IOS(3_0){ NSLog(@"deviceToken:%@",deviceToken); } - (void)application:(UIApplication *)application didFailToRegisterForRemoteNotificationsWithError:(NSError *)error NS_AVAILABLE_IOS(3_0){ NSLog(@"didFailToRegisterForRemoteNotificationsWithError:%@",error); } 设置处理通知的action 和 category
在iOS8以前是没有category这个属性的;
在iOS8注册推送,获取授权的时候,可以一并设置category, 注册的方法直接带有这个参数;
在iOS10, 需要调用一个方法setNotificationCategories:来为管理推送的UNUserNotificationCenter实例设置category, category又可以对应设置action;
//设置category //UNNotificationActionOptionAuthenticationRequired 需要解锁 //UNNotificationActionOptionDestructive 显示为红色 //UNNotificationActionOptionForeground 点击打开app UNNotificationAction *action1 = [UNNotificationAction actionWithIdentifier:@"action1" title:@"策略1行为1" options:UNNotificationActionOptionForeground]; UNTextInputNotificationAction *action2 = [UNTextInputNotificationAction actionWithIdentifier:@"action2" title:@"策略1行为2" options:UNNotificationActionOptionDestructive textInputButtonTitle:@"comment" textInputPlaceholder:@"reply"]; //UNNotificationCategoryOptionNone //UNNotificationCategoryOptionCustomDismissAction 清除通知被触发会走通知的代理方法 //UNNotificationCategoryOptionAllowInCarPlay 适用于行车模式 UNNotificationCategory *category1 = [UNNotificationCategory categoryWithIdentifier:@"category1" actions:@[action2,action1] minimalActions:@[action2,action1] intentIdentifiers:@[] options:UNNotificationCategoryOptionCustomDismissAction]; UNNotificationAction *action3 = [UNNotificationAction actionWithIdentifier:@"action3" title:@"策略2行为1" options:UNNotificationActionOptionForeground]; UNNotificationAction *action4 = [UNNotificationAction actionWithIdentifier:@"action4" title:@"策略2行为2" options:UNNotificationActionOptionForeground]; UNNotificationCategory *category2 = [UNNotificationCategory categoryWithIdentifier:@"category2" actions:@[action3,action4] minimalActions:@[action3,action4] intentIdentifiers:@[] options:UNNotificationCategoryOptionCustomDismissAction]; [[UNUserNotificationCenter currentNotificationCenter] setNotificationCategories:[NSSet setWithObjects:category1,category2, nil]];
设置通知内容
因为iOS10远程通知与本地通知统一起来了,通知内容属性是一致的,不过远程推送就需要在payload进行具体设置了,下面以本地通知为例,介绍关于UNNotificationContent的内容
官网上明确说明了,我们是不能直接创建UNNotificationContent的实例的, 如果我们需要自己去配置内容的各个属性,我们需要用到UNMutableNotificationContent
看一下它的一些属性:
attachments //附件
badge //徽标
body //推送内容body
categoryIdentifier //category标识
launchImageName //点击通知进入应用的启动图
sound //声音
subtitle //推送内容子标题
title //推送内容标题
userInfo //远程通知内容
UNMutableNotificationContent *content = [[UNMutableNotificationContent alloc] init]; content.title = @"Test"; content.subtitle = @"1234567890"; content.body = @"Copyright © 2016年 jpush. All rights reserved."; content.badge = @1; NSError *error = nil; NSString *path = [[NSBundle mainBundle] pathForResource:@"718835727" ofType:@"png"]; UNNotificationAttachment *att = [UNNotificationAttachment attachmentWithIdentifier:@"att1" URL:[NSURL fileURLWithPath:path] options:nil error:&error]; if (error) { NSLog(@"attachment error %@", error); } content.attachments = @[att]; content.categoryIdentifier = @"category1”; //这里设置category1, 是与之前设置的category对应 content.launchImageName = @"1-Eb_0OvtcxJXHZ7-IOoBsaQ"; UNNotificationSound *sound = [UNNotificationSound defaultSound]; content.sound = sound; 
通知触发器
UNNotificationTrigger
iOS 10触发器有4种
•UNPushNotificationTrigger 触发APNS服务,系统自动设置(这是区分本地通知和远程通知的标识)
•UNTimeIntervalNotificationTrigger 一段时间后触发
•UNCalendarNotificationTrigger 指定日期触发
•UNLocationNotificationTrigger 根据位置触发,支持进入某地或者离开某地或者都有
//十秒后 UNTimeIntervalNotificationTrigger *trigger1 = [UNTimeIntervalNotificationTrigger triggerWithTimeInterval:10 repeats:NO]; //每周日早上8:00 NSDateComponents *component = [[NSDateComponents alloc] init]; component.weekday = 1; component.hour = 8; UNCalendarNotificationTrigger *trigger2 = [UNCalendarNotificationTrigger triggerWithDateMatchingComponents:component repeats:YES]; //圆形区域,进入时候进行通知 CLLocationCoordinate2D cen = CLLocationCoordinate2DMake(80.335400, -90.009201); CLCircularRegion *region = [[CLCircularRegion alloc] initWithCenter:cen radius:500.0 identifier:@“center"]; region.notifyOnEntry = YES; //进入的时候 region.notifyOnExit = NO; //出去的时候 UNLocationNotificationTrigger *trigger3 = [UNLocationNotificationTrigger triggerWithRegion:region repeats:NO];
添加通知 / 更新通知
1.创建一个UNNotificationRequest类的实例,一定要为它设置identifier, 在后面的查找,更新, 删除通知,这个标识是可以用来区分这个通知与其他通知
2.把request加到UNUserNotificationCenter, 并设置触发器,等待触发
3.
如果另一个request具有和之前request相同的标识,不同的内容, 可以达到更新通知的目的
NSString *requestIdentifer = @"TestRequest"; UNNotificationRequest *request = [UNNotificationRequest requestWithIdentifier:requestIdentifer content:content trigger:trigger1]; //把通知加到UNUserNotificationCenter, 到指定触发点会被触发 [center addNotificationRequest:request withCompletionHandler:^(NSError * _Nullable error) { }]; //在另外需要更新通知的地方 UNMutableNotificationContent *newContent = [[UNMutableNotificationContent alloc] init]; newContent.title = @"Update"; newContent.subtitle = @"XXXXXXXXX"; newContent.body = @"Copyright © 2016年 jpush. All rights reserved."; UNTimeIntervalNotificationTrigger *trigger1 = [UNTimeIntervalNotificationTrigger triggerWithTimeInterval:3 repeats:NO]; UNNotificationRequest *request = [UNNotificationRequest requestWithIdentifier:@"TestRequest" content:newContent trigger:trigger1]; [[UNUserNotificationCenter currentNotificationCenter] addNotificationRequest:request withCompletionHandler:^(NSError * _Nullable error) { }]; 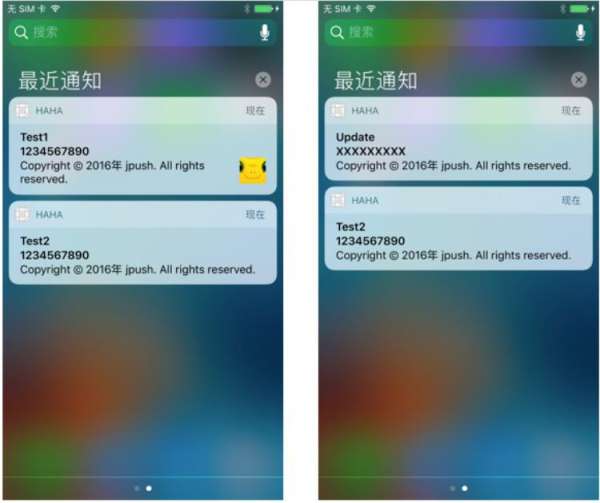
获取和删除通知
这里通知是有两种状态
•Pending 等待触发的通知
•Delivered 已经触发展示在通知中心的通知
//获取未触发的通知 [[UNUserNotificationCenter currentNotificationCenter] getPendingNotificationRequestsWithCompletionHandler:^(NSArray* _Nonnull requests) { NSLog(@"pending: %@", requests); }]; //获取通知中心列表的通知 [[UNUserNotificationCenter currentNotificationCenter] getDeliveredNotificationsWithCompletionHandler:^(NSArray * _Nonnull notifications) { NSLog(@"Delivered: %@", notifications); }]; //清除某一个未触发的通知 [[UNUserNotificationCenter currentNotificationCenter] removePendingNotificationRequestsWithIdentifiers:@[@"TestRequest1"]]; //清除某一个通知中心的通知 [[UNUserNotificationCenter currentNotificationCenter] removeDeliveredNotificationsWithIdentifiers:@[@"TestRequest2"]]; //对应的删除所有通知 [[UNUserNotificationCenter currentNotificationCenter] removeAllPendingNotificationRequests]; [[UNUserNotificationCenter currentNotificationCenter] removeAllDeliveredNotifications];
delegate
iOS10收到通知不再是在application: didReceiveRemoteNotification:方法去处理, iOS10推出新的代理方法,接收和处理各类通知(本地或者远程)
- (void)userNotificationCenter:(UNUserNotificationCenter *)center willPresentNotification:(UNNotification *)notification withCompletionHandler:(void (^)(UNNotificationPresentationOptions))completionHandler { //应用在前台收到通知 NSLog(@"========%@", notification); } - (void)userNotificationCenter:(UNUserNotificationCenter *)center didReceiveNotificationResponse:(UNNotificationResponse *)response withCompletionHandler:(void (^)())completionHandler { //点击通知进入应用 NSLog(@"response:%@", response); } 最后
下一篇文章继续介绍关于富媒体推送的 UNNotificationServiceExtension 和 Notification content extension, 未完待续。。。
以上就是iOS10 推送最新特性研究的详细内容,更多请关注0133技术站其它相关文章!


