本篇文章主要介绍了ios中自定义cell,自定义UITableViewCell,非常具有实用价值,需要的朋友可以参考下。
通过继承UITableViewCell来自定义cell
1、创建一个空的项目、命名:


2、创建一个UITableViewController 并且同时创建xib:

3、设置AppDelegate.m中window的根控制器为刚刚创建的TableViewController:
- (BOOL)application:(UIApplication *)application didFinishLaunchingWithOptions:(NSDictionary *)launchOptions { self.window = [[UIWindow alloc] initWithFrame:[[UIScreen mainScreen] bounds]]; TableViewController *tableViewController = [[[TableViewController alloc] init] autorelease]; //自动释放 //设置根控制器 self.window.rootViewController = tableViewController; [self.window makeKeyAndVisible]; return YES; } 4、创建自定义的UITableViewCell:

5、创建自定义cell的xib 拖放需要的控件 选择User Interface。
 创建空的xib。
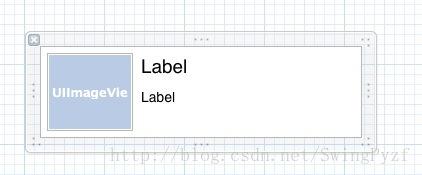
 拖入Cell控件。
 完成自定义的cell控件。
 设置cell控件的Identfier。
 绑定Cell类并且将控件的输出口关联到TableViewCell.h文件中。
6、对TableViewController类编码,在委托方法中设置自定义的Cell:
#import "TableViewController.h" #import "TableViewCell.h" @interface TableViewController (){ NSMutableArray *tableData; //表格数据 } @end @implementation TableViewController - (id)initWithStyle:(UITableViewStyle)style { self = [super initWithStyle:style]; if (self) { // Custom initialization } return self; } - (void)viewDidLoad { [super viewDidLoad]; //初始化表格数据 tableData = [[NSMutableArray alloc] init]; for (int i = 0; i<10; i++) { [tableData addObject:[NSString stringWithFormat:@"MyCellDemon%i",i]]; } //设置row的高度为自定义cell的高度 self.tableView.rowHeight = 90; } - (void)didReceiveMemoryWarning { [super didReceiveMemoryWarning]; } #pragma mark - Table view data source - (NSInteger)numberOfSectionsInTableView:(UITableView *)tableView { #warning Potentially incomplete method implementation. return 1; } - (NSInteger)tableView:(UITableView *)tableView numberOfRowsInSection:(NSInteger)section { #warning Incomplete method implementation. return [tableData count]; } - (UITableViewCell *)tableView:(UITableView *)tableView cellForRowAtIndexPath:(NSIndexPath *)indexPath { //指定cellIdentifier为自定义的cell static NSString *CellIdentifier = @"TableViewCell"; //自定义cell类 TableViewCell *cell = [tableView dequeueReusableCellWithIdentifier:CellIdentifier]; if (cell == nil) { //通过xib的名称加载自定义的cell cell = [[[NSBundle mainBundle] loadNibNamed:@"TableViewCell" owner:self options:nil] lastObject]; } //添加测试数据 cell.titleLabel.text = [tableData objectAtIndex:indexPath.row]; cell.content.text = @"这是一些测试数据"; //测试图片 cell.iamge.image = [UIImage imageNamed:@"testImage.jpg-600"]; return cell; } #pragma mark - Table view delegate - (void)tableView:(UITableView *)tableView didSelectRowAtIndexPath:(NSIndexPath *)indexPath { } @end 最终效果:

以上就是本文的全部内容,希望对大家的学习有所帮助,也希望大家多多支持html中文网。
以上就是详解ios中自定义cell,自定义UITableViewCell的详细内容,更多请关注0133技术站其它相关文章!


