这篇文章主要介绍了Docker容器服务编排利器,主要包括使用使用Docker Compose必要性及定义及一些Docker Compose应用参考资料,本文给大家介绍的非常详细,需要的朋友可以参考下
一、使用Docker Compose必要性及定义
用容器运行一个服务,需要使用docker run命令。但如果我要运行多个服务呢?
假设我要运行一个web服务,还要运行一个db服务,那么是用一个容器运行,还是用多个容器运行呢?
一个容器运行多个服务会造成镜像的复杂度提高,docker倾向于一个容器运行一个应用。
那么复杂的架构就会需要很多的容器,并且需要它们之间有关联(容器之间的依赖和连接)就更复杂了。
这个复杂的问题需要解决,这就涉及到了**容器编排**的问题了。

- Compose
- 编排
- 是对多个容器进行启动和管理的方法
- 例如:LNMT,先启动MySQL,再启动Tomcat,最后启动Nginx
- 服务架构的演进
- 单体服务架构
- 分布式服务架构
- 微服务架构
- 超微服务架构
- 容器编排工具
- docker machine
- 在虚拟机中部署docker容器引擎的工具
- docker compose
- 是一个用于定义和运行多容器Docker的应用程序工具
- docker swarm
- 是Docker Host主机批量管理及资源调度管理工具
- mesos+marathon
- mesos 对计算机计算资源进行管理和调度
- marathon 服务发现及负载均衡的功能
- kubernetes
- google开源的容器编排工具
二、Docker Compose应用参考资料
网址 https://docs.docker.com/compose/

- yaml格式
三、Docker Compose应用最佳实践步骤
3.1 概念
- 工程(project)
- 服务 (Service)
- 容器 (Container)
3.2 步骤
1.定义应用的Dockerfile文件,为了anywhere进行构建。
2.使用docker-compose.yaml定义一套服务,这套服务可以一起在一个隔离环境中运行。
3.使用docker-compose up就可以启动整套服务。
四、Docker Compose安装


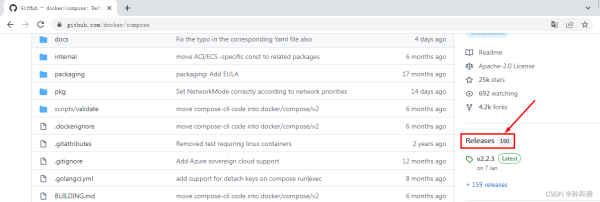
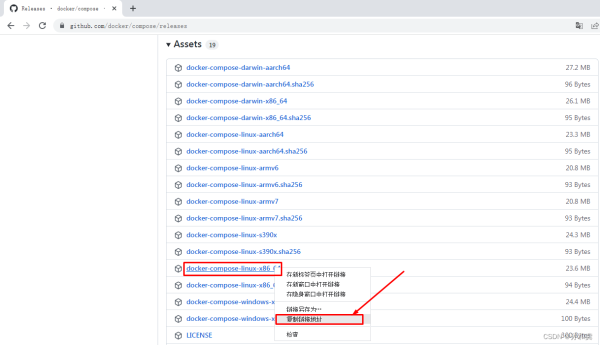
# wget https://github.com/docker/compose/releases/download/v2.2.3/docker-compose-linux-x86_64
# mv docker-compose-linux-x86_64 /usr/bin/docker-compose
# chmod +x /usr/bin/docker-compose
# docker-compose version Docker Compose version v2.2.3
五、Docker Compose应用案例
运行Python语言开发的网站
5.1 网站文件准备
# mkdir flaskproject [root@localhost ~]# cd flaskproject/ [root@localhost flaskproject]#
[root@localhost flaskproject]# vim app.py [root@localhost flaskproject]# cat app.py import time import redis from flask import Flask app = Flask(__name__) cache = redis.Redis(host='redis', port=6379) def get_hit_count(): retries = 5 while True: try: return cache.incr('hits') except redis.exceptions.ConnectionError as exc: if retries == 0: raise exc retries -= 1 time.sleep(0.5) @app.route('/') def hello(): count = get_hit_count() return 'Hello World! I have been seen {} times.\n'.format(count) [root@localhost flaskproject]# vim requirements.txt [root@localhost flaskproject]# cat requirements.txt flask redis
5.2 Dockerfile文件准备
[root@localhost flaskproject]# vim Dockerfile [root@localhost flaskproject]# cat Dockerfile FROM python:3.7-alpine WORKDIR /code ENV FLASK_APP app.py ENV FLASK_RUN_HOST 0.0.0.0 RUN apk add --no-cache gcc musl-dev linux-headers COPY requirements.txt requirements.txt RUN pip install -r requirements.txt COPY . . CMD ["flask", "run"]
5.3 Compose文件准备
[root@localhost flaskproject]# vim docker-compose.yaml [root@localhost flaskproject]# cat docker-compose.yaml version: '3' services: web: build: . ports: - "5000:5000" redis: image: "redis:alpine"
5.4 使用docker-compose up启动容器
[root@localhost flaskproject]# ls app.py docker-compose.yaml Dockerfile requirements.txt
[root@localhost flaskproject]# docker-compose up
输出: [+] Running 7/7 ⠿ redis Pulled 15.8s ⠿ 59bf1c3509f3 Pull complete 2.9s ⠿ 719adce26c52 Pull complete 3.0s ⠿ b8f35e378c31 Pull complete 5.8s ⠿ d034517f789c Pull complete 6.5s ⠿ 3772d4d76753 Pull complete 6.6s ⠿ 211a7f52febb Pull complete 6.8s Sending build context to Docker daemon 714B Step 1/9 : FROM python:3.7-alpine 3.7-alpine: Pulling from library/python 59bf1c3509f3: Already exists 07a400e93df3: Already exists bdabb07397e1: Already exists cd0af01c7b70: Already exists d0f18e022200: Already exists Digest: sha256:5a776e3b5336827faf7a1c3a191b73b5b2eef4cdcfe8b94f59b79cb749a2b5d8 Status: Downloaded newer image for python:3.7-alpine ---> e72b511ad78e Step 2/9 : WORKDIR /code ---> Running in 2b9d07bef719 Removing intermediate container 2b9d07bef719 ---> 7d39e96fadf1 Step 3/9 : ENV FLASK_APP app.py ---> Running in 9bcb28bd632a Removing intermediate container 9bcb28bd632a ---> 79f656a616d5 Step 4/9 : ENV FLASK_RUN_HOST 0.0.0.0 ---> Running in 8470c2dbd6c2 Removing intermediate container 8470c2dbd6c2 ---> e212ba688fcd Step 5/9 : RUN apk add --no-cache gcc musl-dev linux-headers ---> Running in 6e9ca0766bc8 fetch https://dl-cdn.alpinelinux.org/alpine/v3.15/main/x86_64/APKINDEX.tar.gz fetch https://dl-cdn.alpinelinux.org/alpine/v3.15/community/x86_64/APKINDEX.tar.gz (1/13) Installing libgcc (10.3.1_git20211027-r0) (2/13) Installing libstdc++ (10.3.1_git20211027-r0) (3/13) Installing binutils (2.37-r3) (4/13) Installing libgomp (10.3.1_git20211027-r0) (5/13) Installing libatomic (10.3.1_git20211027-r0) (6/13) Installing libgphobos (10.3.1_git20211027-r0) (7/13) Installing gmp (6.2.1-r1) (8/13) Installing isl22 (0.22-r0) (9/13) Installing mpfr4 (4.1.0-r0) (10/13) Installing mpc1 (1.2.1-r0) (11/13) Installing gcc (10.3.1_git20211027-r0) (12/13) Installing linux-headers (5.10.41-r0) (13/13) Installing musl-dev (1.2.2-r7) Executing busybox-1.34.1-r3.trigger OK: 143 MiB in 49 packages Removing intermediate container 6e9ca0766bc8 ---> 273d4f04dfbc Step 6/9 : COPY requirements.txt requirements.txt ---> daf51c54e8ba Step 7/9 : RUN pip install -r requirements.txt ---> Running in 2aa2d30c5311 Collecting flask Downloading Flask-2.0.3-py3-none-any.whl (95 kB) Collecting redis Downloading redis-4.1.3-py3-none-any.whl (173 kB) Collecting Jinja2>=3.0 Downloading Jinja2-3.0.3-py3-none-any.whl (133 kB) Collecting itsdangerous>=2.0 Downloading itsdangerous-2.0.1-py3-none-any.whl (18 kB) Collecting click>=7.1.2 Downloading click-8.0.3-py3-none-any.whl (97 kB) Collecting Werkzeug>=2.0 Downloading Werkzeug-2.0.3-py3-none-any.whl (289 kB) Collecting deprecated>=1.2.3 Downloading Deprecated-1.2.13-py2.py3-none-any.whl (9.6 kB) Collecting packaging>=20.4 Downloading packaging-21.3-py3-none-any.whl (40 kB) Collecting importlib-metadata>=1.0 Downloading importlib_metadata-4.11.1-py3-none-any.whl (17 kB) Collecting wrapt<2,>=1.10 Downloading wrapt-1.13.3-cp37-cp37m-musllinux_1_1_x86_64.whl (78 kB) Collecting typing-extensions>=3.6.4 Downloading typing_extensions-4.1.1-py3-none-any.whl (26 kB) Collecting zipp>=0.5 Downloading zipp-3.7.0-py3-none-any.whl (5.3 kB) Collecting MarkupSafe>=2.0 Downloading MarkupSafe-2.0.1-cp37-cp37m-musllinux_1_1_x86_64.whl (30 kB) Collecting pyparsing!=3.0.5,>=2.0.2 Downloading pyparsing-3.0.7-py3-none-any.whl (98 kB) Installing collected packages: zipp, typing-extensions, wrapt, pyparsing, MarkupSafe, importlib-metadata, Werkzeug, packaging, Jinja2, itsdangerous, deprecated, click, redis, flask Successfully installed Jinja2-3.0.3 MarkupSafe-2.0.1 Werkzeug-2.0.3 click-8.0.3 deprecated-1.2.13 flask-2.0.3 importlib-metadata-4.11.1 itsdangerous-2.0.1 packaging-21.3 pyparsing-3.0.7 redis-4.1.3 typing-extensions-4.1.1 wrapt-1.13.3 zipp-3.7.0 WARNING: Running pip as the 'root' user can result in broken permissions and conflicting behaviour with the system package manager. It is recommended to use a virtual environment instead: https://pip.pypa.io/warnings/venv WARNING: You are using pip version 21.2.4; however, version 22.0.3 is available. You should consider upgrading via the '/usr/local/bin/python -m pip install --upgrade pip' command. Removing intermediate container 2aa2d30c5311 ---> dd8f52b132f8 Step 8/9 : COPY . . ---> b36938a26cf5 Step 9/9 : CMD ["flask", "run"] ---> Running in 260cbfa02959 Removing intermediate container 260cbfa02959 ---> fa04dfec6ff2 Successfully built fa04dfec6ff2 Successfully tagged flaskproject_web:latest Use 'docker scan' to run Snyk tests against images to find vulnerabilities and learn how to fix them [+] Running 3/3 ⠿ Network flaskproject_default Created 0.1s ⠿ Container flaskproject-redis-1 Created 0.1s ⠿ Container flaskproject-web-1 Created 0.1s Attaching to flaskproject-redis-1, flaskproject-web-1 flaskproject-redis-1 | 1:C 15 Feb 2022 14:14:21.696 # oO0OoO0OoO0Oo Redis is starting oO0OoO0OoO0Oo flaskproject-redis-1 | 1:C 15 Feb 2022 14:14:21.696 # Redis version=6.2.6, bits=64, commit=00000000, modified=0, pid=1, just started flaskproject-redis-1 | 1:C 15 Feb 2022 14:14:21.696 # Warning: no config file specified, using the default config. In order to specify a config file use redis-server /path/to/redis.conf flaskproject-redis-1 | 1:M 15 Feb 2022 14:14:21.697 * monotonic clock: POSIX clock_gettime flaskproject-redis-1 | 1:M 15 Feb 2022 14:14:21.698 * Running mode=standalone, port=6379. flaskproject-redis-1 | 1:M 15 Feb 2022 14:14:21.698 # WARNING: The TCP backlog setting of 511 cannot be enforced because /proc/sys/net/core/somaxconn is set to the lower value of 128. flaskproject-redis-1 | 1:M 15 Feb 2022 14:14:21.698 # Server initialized flaskproject-redis-1 | 1:M 15 Feb 2022 14:14:21.698 # WARNING overcommit_memory is set to 0! Background save may fail under low memory condition. To fix this issue add 'vm.overcommit_memory = 1' to /etc/sysctl.conf and then reboot or run the command 'sysctl vm.overcommit_memory=1' for this to take effect. flaskproject-redis-1 | 1:M 15 Feb 2022 14:14:21.698 * Ready to accept connections flaskproject-web-1 | * Serving Flask app 'app.py' (lazy loading) flaskproject-web-1 | * Environment: production flaskproject-web-1 | WARNING: This is a development server. Do not use it in a production deployment. flaskproject-web-1 | Use a production WSGI server instead. flaskproject-web-1 | * Debug mode: off flaskproject-web-1 | * Running on all addresses. flaskproject-web-1 | WARNING: This is a development server. Do not use it in a production deployment. flaskproject-web-1 | * Running on http://172.18.0.2:5000/ (Press CTRL+C to quit)
5.5 访问

到此这篇关于Docker容器服务编排利器的文章就介绍到这了,更多相关Docker容器编排内容请搜索0133技术站以前的文章或继续浏览下面的相关文章希望大家以后多多支持0133技术站!
以上就是Docker容器服务编排利器详解的详细内容,更多请关注0133技术站其它相关文章!


