这篇文章主要介绍了Python中的图形绘制简单动画实操, Matplotlib 是一个非常广泛的库,它也支持图形动画,动画工具以 matplotlib.animation 基类为中心,它提供了一个框架,围绕该框架构建动画,下面来看看具体的实现过程吧,需要的小伙伴可以参考一下
前言:
Matplotlib 是一个非常广泛的库,它也支持图形动画。 动画工具以 matplotlib.animation 基类为中心,它提供了一个框架,围绕该框架构建动画功能。 主要接口有TimedAnimation和FuncAnimation,两者中FuncAnimation是最方便使用的。
1、画螺旋曲线代码
import matplotlib.pyplot as plt import matplotlib.animation as animation import numpy as np # create a figure, axis and plot element fig = plt.figure() ax = plt.axes(xlim=(-50, 50), ylim=(-50, 50)) line, = ax.plot([], [], lw=2) # initialization function def init(): # creating an empty plot/frame line.set_data([], []) return line, # lists to store x and y axis points xdata, ydata = [], [] # animation function def animate(i): # t is a parameter t = 0.1*i # x, y values to be plotted x = t*np.sin(t) y = t*np.cos(t) # appending new points to x, y axes points list xdata.append(x) ydata.append(y) # set/update the x and y axes data line.set_data(xdata, ydata) # return line object return line, # setting a title for the plot plt.title('A growing coil!') # hiding the axis details plt.axis('off') # call the animator anim = animation.FuncAnimation(fig, animate, init_func=init, frames=500, interval=20, blit=True) # save the animation as mp4 video file anim.save('animated_coil.mp4', writer = 'ffmpeg', fps = 30) # show the plot plt.show()2、输出
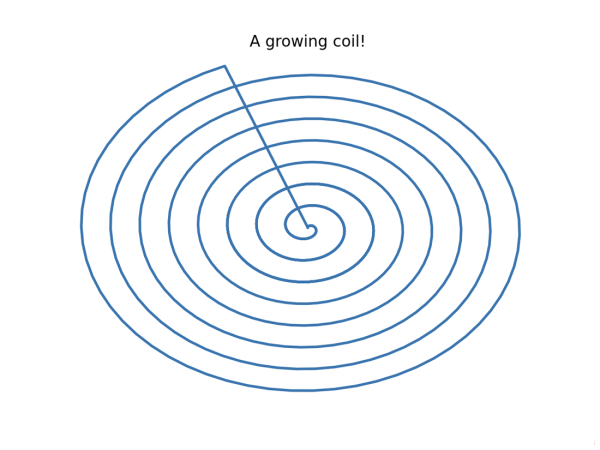
此图为动画截图。
3、代码的部分解释
现在让我们来逐段分析代码:
fig = plt.figure() ax = plt.axes(xlim=(-50, 50), ylim=(-50, 50)) line, = ax.plot([], [], lw=2)
- 1)首先创建一个图形,即所有子图的顶级容器。
- 2)然后创建一个轴元素 ax 作为子图。 在创建轴元素时还定义了 x 和 y 轴的范围/限制。
- 3)最后,创建名为 line, 的 plot 元素。 最初,x 和 y 轴点已定义为空列表,线宽 (lw) 已设置为 2。
def init(): line.set_data([], []) return line,
- 4)声明一个初始化函数
init。 动画师调用此函数来创建第一帧。
def animate(i): # t is a parameter t = 0.1*i # x, y values to be plotted x = t*np.sin(t) y = t*np.cos(t) # appending new points to x, y axes points list xdata.append(x) ydata.append(y) # set/update the x and y axes data line.set_data(xdata, ydata) # return line object return line,
- 5)这是上述程序最重要的功能。
animate()函数被动画师一次又一次地调用来创建每一帧。 调用此函数的次数由帧数决定,该帧数作为帧参数传递给动画师。 - 6)
animate()函数以第 i 个帧的索引作为参数。
t = 0.1*i
- 7)我们巧妙地使用了当前帧的索引作为参数!
x = t*np.sin(t) y = t*np.cos(t)
- 8)由于有了参数 t,可以轻松地绘制任何参数方程。 例如,使用参数方程绘制螺旋线。
line.set_data(xdata, ydata) return line,
- 9)使用
set_data()函数设置 x 和 y 数据,然后返回绘图对象 line, 。
anim = animation.FuncAnimation(fig, animate, init_func=init, frames=500, interval=20, blit=True)
- 10)创建
FuncAnimation对象anim。
它需要下面解释的各种参数:
- fig:要绘制的图形。
- animate:为每一帧重复调用的函数。
- init_func:函数用于绘制清晰的框架。它在第一帧之前被调用一次。
- frames:帧数。
- interval:帧之间的持续时间。
- blit:设置
blit=True意味着只会绘制那些已经改变的部分。
到此这篇关于Python中的图形绘制简单动画实操的文章就介绍到这了,更多相关Python中的图形绘制动画内容请搜索0133技术站以前的文章或继续浏览下面的相关文章希望大家以后多多支持0133技术站!
以上就是Python中的图形绘制简单动画实操的详细内容,更多请关注0133技术站其它相关文章!


