这篇文章主要介绍了Python 实现 PS 滤镜的旋涡特效,帮助大家更好的利用python处理图片,感兴趣的朋友可以了解下
实现效果:
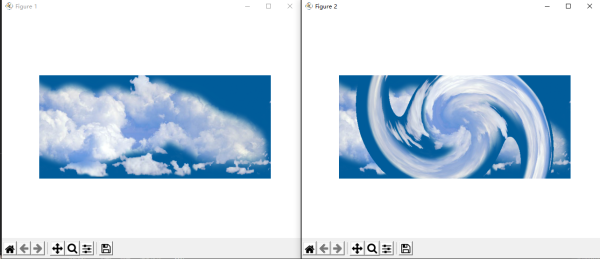
实现代码
import numpy as np from skimage import img_as_float import matplotlib.pyplot as plt from skimage import io import math import numpy.matlib file_name2='D:/2020121173119242.png-600' # 图片路径 img=io.imread(file_name2) img = img_as_float(img) row, col, channel = img.shape img_out = img * 1.0 degree = 70 center_x = (col-1)/2.0 center_y = (row-1)/2.0 xx = np.arange (col) yy = np.arange (row) x_mask = numpy.matlib.repmat (xx, row, 1) y_mask = numpy.matlib.repmat (yy, col, 1) y_mask = np.transpose(y_mask) xx_dif = x_mask - center_x yy_dif = center_y - y_mask r = np.sqrt(xx_dif * xx_dif + yy_dif * yy_dif) theta = np.arctan(yy_dif / xx_dif) mask_1 = xx_dif <0 theta * (1 - mask_1) + (theta math.pi) mask_1 r degree x_new np.cos(theta) center_x y_new=center_y np.sin(theta) int_x=np.floor (x_new) int_x.astype(int) int_y=np.floor (y_new) int_y.astype(int) for ii in range(row): jj range (col): new_xx=int_x [ii, jj] new_yy=int_y if < 0 or> col -1 : continue if y_new [ii, jj] <0 or y_new [ii, jj]> row -1 : continue img_out[ii, jj, :] = img[new_yy, new_xx, :] plt.figure (1) plt.imshow (img) plt.axis('off') plt.figure (2) plt.imshow (img_out) plt.axis('off') plt.show()以上就是Python 实现 PS 滤镜的旋涡特效的详细内容,更多关于python ps滤镜漩涡特效的资料请关注html中文网其它相关文章!
以上就是Python 实现PS滤镜的旋涡特效的详细内容,更多请关注0133技术站其它相关文章!


