这篇文章主要介绍了Python实现AI换脸的简单代码,本文通过实例代码给大家介绍的非常详细,对大家的学习或工作具有一定的参考借鉴价值,需要的朋友可以参考下
需要用到的接口:
获取人脸信息的接口:https://api-cn.faceplusplus.com/facepp/v3/detect
实现换脸的接口 :https://api-cn.faceplusplus.com/imagepp/v1/mergeface
代码分为三步
代码:
import requests import json import simplejson import base64 #第一步:获取人脸关键点 def find_face(imgpath): """ :param imgpath: 图片的地址 :return: 一个字典类型的人脸关键点 如:{'top': 156, 'left': 108, 'width': 184, 'height': 184} """ http_url = 'https://api-cn.faceplusplus.com/facepp/v3/detect' #获取人脸信息的接口 data = { "api_key":"x2NyKaa6vYuArYwat4x0-NpIbM9CrwGU",#访问url所需要的参数 "api_secret":"OuHx-Xaey1QrORwdG7QetGG5JhOIC8g7",#访问url所需要的参数 "image_url":imgpath, #图片地址 "return_landmark":1 } files = {'image_file':open(imgpath,'rb')} #定义一个字典存放图片的地址 response = requests.post(http_url,data=data,files=files) res_con1 = response.content.decode('utf-8') res_json = simplejson.loads(res_con1) faces = res_json['faces'] list = faces[0] rectangle = list['face_rectangle'] return rectangle #第二步:实现换脸 def merge_face(image_url1,image_url2,image_url,number): """ :param image_url1: 被换脸的图片路径 :param image_url2: 换脸的图片路径 :param image_url: 换脸后生成图片所保存的路径 :param number: 换脸的相似度 """ #首先获取两张图片的人脸关键点 face1 = find_face(image_url1) face2 = find_face(image_url2) #将人脸转换为字符串的格式 rectangle1 = str(str(face1['top']) + "," + str(face1['left']) + "," + str(face1['width']) + "," + str(face1['height'])) rectangle2 = str(str(face2['top']) + "," + str(face2['left']) + "," + str(face2['width']) + "," + str(face2['height'])) #读取两张图片 f1 = open(image_url1,'rb') f1_64 = base64.b64encode(f1.read()) f1.close() f2 = open(image_url2, 'rb') f2_64 = base64.b64encode(f2.read()) f2.close() url_add = 'https://api-cn.faceplusplus.com/imagepp/v1/mergeface' #实现换脸的接口 data={ "api_key": "x2NyKaa6vYuArYwat4x0-NpIbM9CrwGU", "api_secret": "OuHx-Xaey1QrORwdG7QetGG5JhOIC8g7", "template_base64":f1_64, "template_rectangle":rectangle1, "merge_base64":f2_64, "merge_rectangle":rectangle2, "merge_rate":number } response1 = requests.post(url_add,data=data) res_con1 = response1.content.decode('utf-8') res_dict = json.JSONDecoder().decode(res_con1) result = res_dict['result'] imgdata = base64.b64decode(result) file=open(image_url,'wb') file.write(imgdata) file.close() if __name__ == '__main__': image1 = r"meizi1.jpg-600" image2 = r"meizi.jpg-600" image3 = r"face1.jpg-600" merge_face(image1,image2,image3,100)效果:
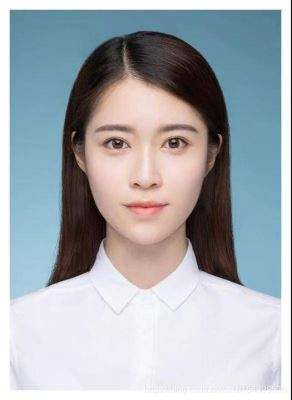
换脸前

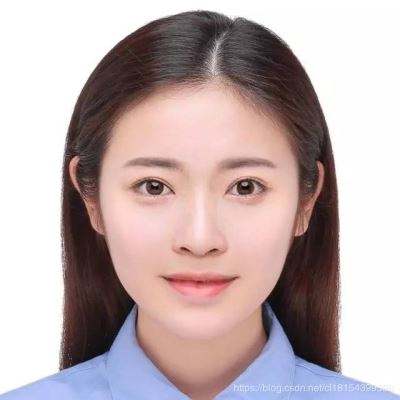
要换的脸:
换脸后:
总结
到此这篇关于Python实现AI换脸的代码的文章就介绍到这了,更多相关Python实现AI换脸内容请搜索html中文网以前的文章或继续浏览下面的相关文章希望大家以后多多支持html中文网!
以上就是Python实现AI换脸功能的详细内容,更多请关注0133技术站其它相关文章!


