本文主要介绍了SpringBoot+SpringSecurity+jwt实现验证,文中通过示例代码介绍的非常详细,对大家的学习或者工作具有一定的参考学习价值,需要的朋友们下面随着小编来一起学习学习吧
记录一下使用springSecurity实现jwt的授权方法,这方法可以实现权限的基本认证。当然这个案例还有许多的问题,不过还是先记录一下。其他功能以后在补充。
建议工程创建流程
- 创建 JwtTokenUtils
- 创建 jwtAccessDeniedHandler 和 JwtAuthenticationEntryPoint
- 创建 UserDetailsServiceImpl
- 创建 JwtAuthenticationFilter
- 配置 Security信息
- 启动类的信息
环境
- springBoot 2.3.3
- springSecurity 5.0
- jjwt 0.91
pox.xml 文件主要信息
io.jsonwebtoken jjwt 0.9.1 org.springframework.boot spring-boot-starter-security org.springframework.boot spring-boot-starter-web
目录结构信息
请忽略文件命名

jwtAccessDeniedHandler 和 JwtAuthenticationEntryPoint
这两个类的作用是用户访问没有授权资源和携带错误token的错误返回处理信息类,要使用这两个类只需要在security的配置文件中配置一下就可以只用了
/** * @author Bxsheng * @blogAddress www.kdream.cn * @createTIme 2020/9/17 * since JDK 1.8 * 当用户在没有授权的时候,返回的指定信息 */ @Component public class jwtAccessDeniedHandler implements AccessDeniedHandler { @Override public void handle(HttpServletRequest httpServletRequest, HttpServletResponse httpServletResponse, AccessDeniedException e) throws IOException, ServletException { System.out.println("用户访问没有授权资源"); System.out.println(e.getMessage()); httpServletResponse.sendError(HttpServletResponse.SC_UNAUTHORIZED, e==null?"用户访问没有授权资源":e.getMessage()); } } /** * @author Bxsheng * @blogAddress www.kdream.cn * @createTIme 2020/9/17 * since JDK 1.8 */ @Component public class JwtAuthenticationEntryPoint implements AuthenticationEntryPoint { @Override public void commence(HttpServletRequest httpServletRequest, HttpServletResponse httpServletResponse, AuthenticationException e) throws IOException, ServletException { System.out.println("用户访问资源没有携带正确的token"); System.out.println(e.getMessage()); httpServletResponse.sendError(HttpServletResponse.SC_UNAUTHORIZED, e==null?"用户访问资源没有携带正确的token":e.getMessage()); } } UserDetailsServiceImpl 登录信息验证
该类直接继承UserDetailsService 进行登录信息验证,在输入账户密码进行登录的时候,会进入这个类进行验证信息。
当然我这里是直接使用了写死的密码,正常应该从数据库中获取用户的信息和权限信息
@Service public class UserDetailsServiceImpl implements UserDetailsService { @Override public UserDetails loadUserByUsername(String s) throws UsernameNotFoundException { //直接写死数据信息,可以在这里获取数据库的信息并进行验证 UserDetails userDetails = User.withUsername(s).password(new BCryptPasswordEncoder().encode("123456")) .authorities("bxsheng").build(); return userDetails; } } JwtTokenUtils jwt包装类
该类直接使用 slyh 的 [SpringBoot+JWT实现登录权限控制(代码))](( https://www.0133.cn/article/257119.htm)的文章里面的类。
package cn.kdream.securityjwt.utlis; import io.jsonwebtoken.*; import java.util.Date; import java.util.HashMap; import java.util.Map; /** * @author Bxsheng * @blogAddress www.kdream.cn * @createTIme 2020/9/16 * since JDK 1.8 */ public class JwtTokenUtils { public static final String TOKEN_HEADER = "Authorization"; public static final String TOKEN_PREFIX = "Bearer "; public static final String SECRET = "jwtsecret"; public static final String ISS = "echisan"; private static final Long EXPIRATION = 60 * 60 * 3L; //过期时间3小时 private static final String ROLE = "role"; //创建token public static String createToken(String username, String role, boolean isRememberMe){ Map map = new HashMap(); map.put(ROLE, role); return Jwts.builder() .signWith(SignatureAlgorithm.HS512, SECRET) .setClaims(map) .setIssuer(ISS) .setSubject(username) .setIssuedAt(new Date()) .setExpiration(new Date(System.currentTimeMillis() + EXPIRATION * 1000)) .compact(); } //从token中获取用户名(此处的token是指去掉前缀之后的) public static String getUserName(String token){ String username; try { username = getTokenBody(token).getSubject(); } catch ( Exception e){ username = null; } return username; } public static String getUserRole(String token){ return (String) getTokenBody(token).get(ROLE); } private static Claims getTokenBody(String token){ Claims claims = null; try{ claims = Jwts.parser().setSigningKey(SECRET).parseClaimsJws(token).getBody(); } catch(ExpiredJwtException e){ e.printStackTrace(); } catch(UnsupportedJwtException e){ e.printStackTrace(); } catch(MalformedJwtException e){ e.printStackTrace(); } catch(SignatureException e){ e.printStackTrace(); } catch(IllegalArgumentException e){ e.printStackTrace(); } return claims; } //是否已过期 public static boolean isExpiration(String token){ try{ return getTokenBody(token).getExpiration().before(new Date()); } catch(Exception e){ System.out.println(e.getMessage()); } return true; } } JwtAuthenticationFilter 自定义验证jwt
该类直接使用 slyh 的 [SpringBoot+JWT实现登录权限控制(代码))](( https://www.0133.cn/article/257119.htm))的文章里面的类。
这个类主要的作用是验证jwt信息 ,主要携带了token请求过来,解析jwt并设置在security的上下文中。这样做的其中一个目的是你获得了token中携带的权限信息,并保存在上下文中。你就可以对用户进行权限认证了
/** * @author Bxsheng * @blogAddress www.kdream.cn * @createTIme 2020/9/16 * since JDK 1.8 */ public class JwtAuthenticationFilter extends BasicAuthenticationFilter { public JwtAuthenticationFilter(AuthenticationManager authenticationManager) { super(authenticationManager); } @Override protected void doFilterInternal(HttpServletRequest request, HttpServletResponse response, FilterChain chain) throws IOException, ServletException { String tokenHeader = request.getHeader(JwtTokenUtils.TOKEN_HEADER); //如果请求头中没有Authorization信息则直接放行了 if(tokenHeader == null || !tokenHeader.startsWith(JwtTokenUtils.TOKEN_PREFIX)){ chain.doFilter(request, response); return; } //如果请求头中有token,则进行解析,并且设置认证信息 if(!JwtTokenUtils.isExpiration(tokenHeader.replace(JwtTokenUtils.TOKEN_PREFIX,""))){ //设置上下文 UsernamePasswordAuthenticationToken authentication = getAuthentication(tokenHeader); SecurityContextHolder.getContext().setAuthentication(authentication); } super.doFilterInternal(request, response, chain); } //获取用户信息 private UsernamePasswordAuthenticationToken getAuthentication(String tokenHeader){ String token = tokenHeader.replace(JwtTokenUtils.TOKEN_PREFIX, ""); String username = JwtTokenUtils.getUserName(token); // 获得权限 添加到权限上去 String role = JwtTokenUtils.getUserRole(token); List roles = new ArrayList(); roles.add(new GrantedAuthority() { @Override public String getAuthority() { return role; } }); if(username != null){ return new UsernamePasswordAuthenticationToken(username, null,roles); } return null; } } security的配置信息
@EnableGlobalMethodSecurity(prePostEnabled = true) 开启prePostEnabled注解方式授权
@Configuration @EnableWebSecurity @EnableGlobalMethodSecurity(prePostEnabled = true) public class SecurityJwtConfig extends WebSecurityConfigurerAdapter { @Autowired private jwtAccessDeniedHandler jwtAccessDeniedHandler; @Autowired private JwtAuthenticationEntryPoint jwtAuthenticationEntryPoint; @Override protected void configure(HttpSecurity http) throws Exception { http.cors().and().csrf().disable().authorizeRequests() .antMatchers(HttpMethod.OPTIONS,"/**") .permitAll() .antMatchers("/").permitAll() //login 不拦截 .antMatchers("/login").permitAll() .anyRequest().authenticated() //授权 .and() // 禁用session .sessionManagement().sessionCreationPolicy(SessionCreationPolicy.STATELESS); // 使用自己定义的拦截机制,拦截jwt http.addFilterBefore(new JwtAuthenticationFilter(authenticationManager()), UsernamePasswordAuthenticationFilter.class) //授权错误信息处理 .exceptionHandling() //用户访问资源没有携带正确的token .authenticationEntryPoint(jwtAuthenticationEntryPoint) //用户访问没有授权资源 .accessDeniedHandler(jwtAccessDeniedHandler); } @Bean public PasswordEncoder passwordEncoder(){ //使用的密码比较方式 return new BCryptPasswordEncoder(); } } 启动类
我在启动类中配置了三个方法,一个是用来进行登录信息的,另外两个设置了需要权限访问
@SpringBootApplication @RestController public class SecurityJwtApplication { private final AuthenticationManagerBuilder authenticationManagerBuilder; public SecurityJwtApplication(AuthenticationManagerBuilder authenticationManagerBuilder) { this.authenticationManagerBuilder = authenticationManagerBuilder; } public static void main(String[] args) { SpringApplication.run(SecurityJwtApplication.class, args); } @GetMapping("/") public String index(){ return "security jwt"; } @PostMapping("/login") public String login(@RequestParam String u,@RequestParam String p){ // 登陆验证 UsernamePasswordAuthenticationToken token = new UsernamePasswordAuthenticationToken(u, p); Authentication authentication = authenticationManagerBuilder.getObject().authenticate(token); SecurityContextHolder.getContext().setAuthentication(authentication); //创建jwt信息 String token1 = JwtTokenUtils.createToken(u,"bxsheng", true); return token1; } @GetMapping("/role") @PreAuthorize("hasAnyAuthority('bxsheng')") public String roleInfo(){ return "需要获得bxsheng权限,才可以访问"; } @GetMapping("/roles") @PreAuthorize("hasAnyAuthority('kdream')") public String rolekdream(){ return "需要获得kdream权限,才可以访问"; } } 效果
直接访问需要授权的用户信息
直接没有使用token直接访问只要授权的资源信息,会进入JwtAuthenticationEntryPoint 类

获取token
访问在启动类中的login方法,获取token信息
因为我使用了固定的密码,所以在使用错误的密码访问的时候,可以在springboot的全局异常处理中捕获到异常信息
/** * @author Bxsheng * @blogAddress www.kdream.cn * @createTIme 2020/9/17 * since JDK 1.8 */ @RestControllerAdvice public class Error { @ExceptionHandler(BadCredentialsException.class) public void badCredentialsException(BadCredentialsException e){ System.out.println(e.getMessage());//用户名或密码错误 // throw new BadCredentialsException(e.getMessage()); } } 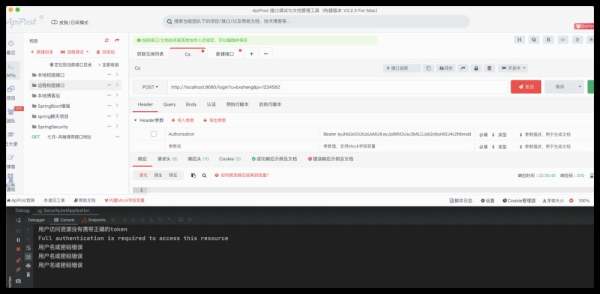
正确的获取token,并进行受保护的资源访问
里面有写死的bxsheng权限信息,所以正常是可以获取bxsheng标识的资源信息的。

成功获取信息

尝试获取无权限资源信息
使用token直接访问无权限资源信息,会进入jwtAccessDeniedHandler 类

至此应该可以说算完成简单的权限管理了。
到此这篇关于SpringBoot+SpringSecurity+jwt实现验证的文章就介绍到这了,更多相关SpringBoot SpringSecurity jwt 验证内容请搜索0133技术站以前的文章或继续浏览下面的相关文章希望大家以后多多支持0133技术站!
以上就是SpringBoot+SpringSecurity+jwt实现验证的详细内容,更多请关注0133技术站其它相关文章!


