这篇文章主要介绍了springboot+websocket+redis搭建的实现,文中通过示例代码介绍的非常详细,对大家的学习或者工作具有一定的参考学习价值,需要的朋友们下面随着小编来一起学习学习吧
在多负载环境下使用websocket。
一、原因
在某些业务场景,我们需要页面对于后台的操作进行实时的刷新,这时候就需要使用websocket。
通常在后台单机的情况下没有任何的问题,如果后台经过nginx等进行负载的话,则会导致前台不能准备的接收到后台给与的响应。socket属于长连接,其session只会保存在一台服务器上,其他负载及其不会持有这个session,此时,我们需要使用redis的发布订阅来实现,session的共享。
二、环境准备
在https://mvnrepository.com/里,查找websocket的依赖。使用springboot的starter依赖,注意对应自己springboot的版本。
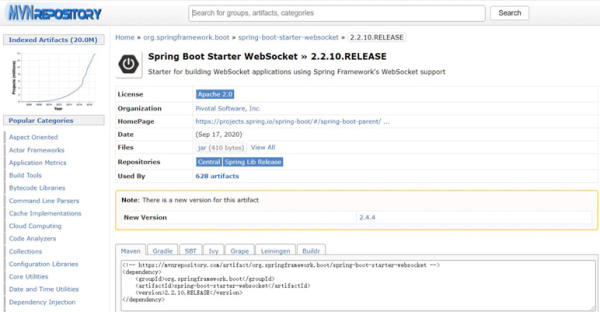
org.springframework.boot spring-boot-starter-websocket 2.2.10.RELEASE
除此之外添加redis的依赖,也使用starter版本:
org.springframework.boot spring-boot-starter-data-redis
三、代码
redis监听配置:
/** * @description: redis监听配置类 * @author:weirx * @date:2021/3/22 14:08 * @version:3.0 */ @Configuration public class RedisConfig { /** * description: 手动注册Redis监听到IOC * * @param redisConnectionFactory * @return: org.springframework.data.redis.listener.RedisMessageListenerContainer * @author: weirx * @time: 2021/3/22 14:11 */ @Bean public RedisMessageListenerContainer redisMessageListenerContainer(RedisConnectionFactory redisConnectionFactory) { RedisMessageListenerContainer container = new RedisMessageListenerContainer(); container.setConnectionFactory(redisConnectionFactory); return container; } } webSocket配置:
/** * @description: websocket配置类 * @author:weirx * @date:2021/3/22 14:11 * @version:3.0 */ @Configuration public class WebSocketConfig { /** * description: 这个配置类的作用是要注入ServerEndpointExporter, * 这个bean会自动注册使用了@ServerEndpoint注解声明的Websocket endpoint。 * 如果是使用独立的servlet容器,而不是直接使用springboot的内置容器, * 就不要注入ServerEndpointExporter,因为它将由容器自己提供和管理。 * * @return: org.springframework.web.socket.server.standard.ServerEndpointExporter * @author: weirx * @time: 2021/3/22 14:12 */ @Bean public ServerEndpointExporter serverEndpointExporter(){ return new ServerEndpointExporter(); } } redis工具类:
@Component public class RedisUtil { @Autowired private StringRedisTemplate stringRedisTemplate; /** * 发布 * * @param key */ public void publish(String key, String value) { stringRedisTemplate.convertAndSend(key, value); } } WebSocket服务提供类:
/** * description: @ServerEndpoint 注解是一个类层次的注解, * 它的功能主要是将目前的类定义成一个websocket服务器端,注解的值将被用于监听用户连接的终端访问URL地址, * 客户端可以通过这个URL来连接到WebSocket服务器端使用springboot的唯一区别是要@Component声明下, * 而使用独立容器是由容器自己管理websocket的,但在springboot中连容器都是spring管理的。 * * @author: weirx * @time: 2021/3/22 14:31 */ @Slf4j @Component @ServerEndpoint("/websocket/server/{loginName}") public class WebSocketServer { /** * 因为@ServerEndpoint不支持注入,所以使用SpringUtils获取IOC实例 */ private RedisMessageListenerContainer redisMessageListenerContainer = ApplicationContextProvider.getBean(RedisMessageListenerContainer.class); /** * 静态变量,用来记录当前在线连接数。应该把它设计成线程安全的。 */ private static AtomicInteger onlineCount = new AtomicInteger(0); /** * concurrent包的线程安全Set,用来存放每个客户端对应的webSocket对象。 * 若要实现服务端与单一客户端通信的话,可以使用Map来存放,其中Key可以为用户标识 */ private static CopyOnWriteArraySet webSocketSet = new CopyOnWriteArraySet(); /** * 与某个客户端的连接会话,需要通过它来给客户端发送数据 */ private Session session; /** * redis监听 */ private SubscribeListener subscribeListener; /** * 连接建立成功调用的方法 * * @param session 可选的参数。session为与某个客户端的连接会话,需要通过它来给客户端发送数据 */ @OnOpen public void onOpen(@PathParam("loginName") String loginName, Session session) { this.session = session; //加入set中 webSocketSet.add(this); //在线数加1 addOnlineCount(); log.info("有新连接[" + loginName + "]加入!当前在线人数为{}", getOnlineCount()); subscribeListener = new SubscribeListener(); subscribeListener.setSession(session); //设置订阅topic redisMessageListenerContainer.addMessageListener( subscribeListener, new ChannelTopic(Constants.TOPIC_PREFIX + loginName)); } /** * 连接关闭调用的方法 */ @OnClose public void onClose() throws IOException { //从set中删除 webSocketSet.remove(this); //在线数减1 subOnlineCount(); redisMessageListenerContainer.removeMessageListener(subscribeListener); log.info("有一连接关闭!当前在线人数为{}", getOnlineCount()); } /** * 收到客户端消息后调用的方法 * * @param message 客户端发送过来的消息 * @param session 可选的参数 */ @OnMessage public void onMessage(String message, Session session) { log.info("来自客户端的消息:{}", message); //群发消息 for (WebSocketServer item : webSocketSet) { try { item.sendMessage(message); } catch (IOException e) { log.info("发送消息异常:msg = {}", e); continue; } } } /** * 发生错误时调用 * * @param session * @param error */ @OnError public void onError(Session session, Throwable error) { log.info("发生错误,{}", error); } /** * 这个方法与上面几个方法不一样。没有用注解,是根据自己需要添加的方法。 * * @param message * @throws IOException */ public void sendMessage(String message) throws IOException { this.session.getBasicRemote().sendText(message); } public int getOnlineCount() { return onlineCount.get(); } public void addOnlineCount() { WebSocketServer.onlineCount.getAndIncrement(); } public void subOnlineCount() { WebSocketServer.onlineCount.getAndDecrement(); } } redis消息发布:
@Autowired private RedisUtil redisUtil; @Override public Result send(String loginName, String msg) { //推送站内信webSocket redisUtil.publish("TOPIC" + loginName, msg); return Result.success(); } 前端vue代码:
消息内容: {{ responseData }}
四、测试
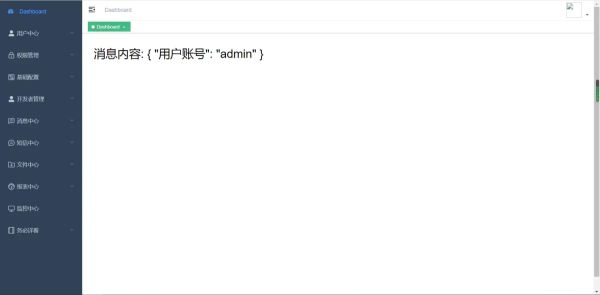
发送前
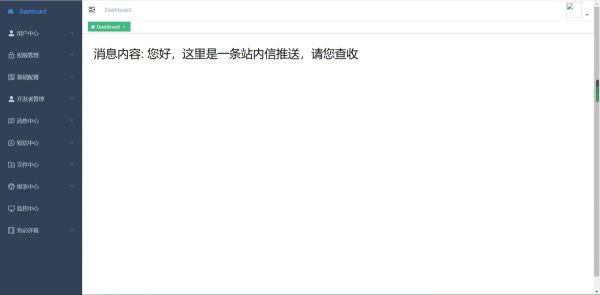
发送后
到此这篇关于springboot+websocket+redis搭建的实现的文章就介绍到这了,更多相关springboot websocket redis搭建内容请搜索html中文网以前的文章或继续浏览下面的相关文章希望大家以后多多支持html中文网!
以上就是springboot+websocket+redis搭建的实现的详细内容,更多请关注0133技术站其它相关文章!


