这篇文章主要介绍了使用Springboot搭建OAuth2.0 Server的方法示例,小编觉得挺不错的,现在分享给大家,也给大家做个参考。一起跟随小编过来看看吧
OAuth是一个关于授权(authorization)的开放网络标准,在全世界得到广泛应用,目前的版本是2.0版。
本文对OAuth 2.0的设计思路和运行流程,做一个简明通俗的解释,主要参考材料为RFC 6749。
OAuth 简介
OAuth 是由 Blaine Cook、Chris Messina、Larry Halff 及 David Recordon 共同发起的,目的在于为 API 访问授权提供一个安全、开放的标准。
基于 OAuth 认证授权具有以下特点:
- 安全。OAuth 与别的授权方式不同之处在于:OAuth 的授权不会使消费方(Consumer)触及到用户的帐号信息(如用户名与密码),也是是说,消费方无需使用用户的用户名与密码就可以申请获得该用户资源的授权。
- 开放。任何消费方都可以使用 OAuth 认证服务,任何服务提供方 (Service Provider) 都可以实现自身的 OAuth 认证服务。
- 简单。不管是消费方还是服务提供方,都很容易于理解与使用。
OAuth 的解决方案如下图所示。
图 1. OAuth Solution

如 图 1 所示 OAuth 解决方案中用户、消费方及其服务提供方之间的三角关系:当用户需要 Consumer 为其提供某种服务时,该服务涉及到需要从服务提供方那里获取该用户的保护资源。OAuth 保证:只有在用户显式授权的情况下(步骤 4),消费方才可以获取该用户的资源,并用来服务于该用户。
从宏观层次来看,OAuth 按以下方式工作:
- 消费方与不同的服务提供方建立了关系。
- 消费方共享一个密码短语或者是公钥给服务提供方,服务提供方使用该公钥来确认消费方的身份。
- 消费方根据服务提供方将用户重定向到登录页面。
- 该用户登录后告诉服务提供方该消费方访问他的保护资源是没问题的。 前提
阅读本文之前,你需要了解:
- Spring Boot
- Spring MVC
- Spring Security
- Google 浏览器插件Postman
pom.xml文件如下
4.0.0 cn.iigrowing.study.oauth2 demo01 0.0.1-SNAPSHOT jar my.oauth01 Demo project for Spring Boot org.springframework.boot spring-boot-starter-parent 1.5.2.RELEASE UTF-8 UTF-8 1.8 org.springframework.boot spring-boot-starter org.springframework.boot spring-boot-starter-test test org.springframework.boot spring-boot-starter-web org.springframework.security.oauth spring-security-oauth2 org.springframework.boot spring-boot-maven-plugin
本项目需要添加的依赖非常简单,一共只有两个,一个是Spring Web,另一个是Spring OAuth2。
接下来是本文的核心,一共三个配置类。
SecurityConfig
package cn.iigrowing.study.oauth2.demo01; import org.springframework.context.annotation.Bean; import org.springframework.context.annotation.Configuration; import org.springframework.security.authentication.AuthenticationManager; import org.springframework.security.config.annotation.authentication.builders.AuthenticationManagerBuilder; import org.springframework.security.config.annotation.web.builders.HttpSecurity; import org.springframework.security.config.annotation.web.configuration.EnableWebSecurity; import org.springframework.security.config.annotation.web.configuration.WebSecurityConfigurerAdapter; @Configuration @EnableWebSecurity public class SecurityConfig extends WebSecurityConfigurerAdapter { @Override protected void configure(AuthenticationManagerBuilder auth) throws Exception { auth.inMemoryAuthentication() .withUser("user").password("123456").authorities("ROLE_USER"); } @Override protected void configure(HttpSecurity http) throws Exception { http.httpBasic() .and().csrf().disable() .authorizeRequests() .antMatchers("/login").permitAll() .anyRequest().authenticated() .and() .formLogin() .and() .logout().permitAll(); } @Override @Bean public AuthenticationManager authenticationManagerBean() throws Exception { return super.authenticationManagerBean(); } }此处主要做了两件事情:
配置系统用户,这里使用内存存储,添加了用户名为 user ,角色为 USER 的用户
@Override protected void configure(AuthenticationManagerBuilder auth) throws Exception { auth.inMemoryAuthentication() .withUser("user").password("123456").authorities("ROLE_USER"); }配置了默认表单登陆以及禁用了 csrf 功能,并开启了 httpBasic 认证
@Override protected void configure(HttpSecurity http) throws Exception { http.httpBasic() .and().csrf().disable() .authorizeRequests() .antMatchers("/login").permitAll() .anyRequest().authenticated() .and() .formLogin() .and() .logout().permitAll(); }AuthorizationServerConfig
package cn.iigrowing.study.oauth2.demo01; import org.springframework.beans.factory.annotation.Autowired; import org.springframework.beans.factory.annotation.Qualifier; import org.springframework.context.annotation.Configuration; import org.springframework.security.authentication.AuthenticationManager; import org.springframework.security.oauth2.config.annotation.configurers.ClientDetailsServiceConfigurer; import org.springframework.security.oauth2.config.annotation.web.configuration.AuthorizationServerConfigurerAdapter; import org.springframework.security.oauth2.config.annotation.web.configuration.EnableAuthorizationServer; import org.springframework.security.oauth2.config.annotation.web.configurers.AuthorizationServerEndpointsConfigurer; @Configuration @EnableAuthorizationServer public class AuthorizationServerConfig extends AuthorizationServerConfigurerAdapter { @Autowired @Qualifier("authenticationManagerBean") private AuthenticationManager authenticationManager; @Override public void configure(ClientDetailsServiceConfigurer clients) throws Exception { clients.inMemory() .withClient("client").secret("123456").scopes("read") .authorizedGrantTypes("authorization_code") .redirectUris("https://www.getpostman.com/oauth2/callback"); } @Override public void configure(AuthorizationServerEndpointsConfigurer endpoints) throws Exception { endpoints.authenticationManager(authenticationManager); } }这个类是OAuth2认证的核心配置类,在这个类中,配置了OAuth Client的信息,这里有几个地方需要注意:
@EnableAuthorizationServer这个注解告诉 Spring 这个应用是 OAuth2 的授权服务器- 必须配置
authorizedGrantTypes
,它代表了OAuth Client允许认证的类型,其值主要有:
- authorization_code
- password
- client_credentials
- implicit refresh_token
这个配置项接受的类型是个数组,允许配置多个;关于这几种类型的区别,请查看这里不再赘述
redirectUris 关于这个配置项,是在 OAuth2协议中,认证成功后的回调地址,因为稍后我们会使用 Postman 作为测试工具,故此处值固定为 https://www.getpostman.com/oauth2/callback ,此值同样可以配置多个 ResourceServerConfig
package cn.iigrowing.study.oauth2.demo01; import org.springframework.context.annotation.Configuration; import org.springframework.security.config.annotation.web.builders.HttpSecurity; import org.springframework.security.config.http.SessionCreationPolicy; import org.springframework.security.oauth2.config.annotation.web.configuration.EnableResourceServer; import org.springframework.security.oauth2.config.annotation.web.configuration.ResourceServerConfigurerAdapter; import org.springframework.security.oauth2.config.annotation.web.configurers.ResourceServerSecurityConfigurer; @Configuration @EnableResourceServer public class ResourceServerConfig extends ResourceServerConfigurerAdapter { @Override public void configure(ResourceServerSecurityConfigurer resources) { resources.resourceId(“users-info”); } @Override public void configure(HttpSecurity http) throws Exception { http .sessionManagement().sessionCreationPolicy(SessionCreationPolicy.STATELESS) .and() .requestMatchers() .antMatchers(“/users/**”) .and().authorizeRequests() .antMatchers(“/users/**”) .authenticated(); } }这个类表明了此应用是OAuth2 的资源服务器,此处主要指定了受资源服务器保护的资源链接,我们将提供以下的资源:
@RestController @RequestMapping("users") public class UserController { @GetMapping("me") public Principal me(Principal principal) { return principal; } }注:
资源服务器可以和授权服务器是同一个,也可以分开部署
最后,我们还需添加 application.yml , 配置资源服务器的filter的顺序
server: port: 8043 context-path: /uaa logging: level: org.springframework.security: DEBUG spring: application: name: oauth-server security: oauth2: resource: serviceId: ${PREFIX:}resource # refer to: https://github.com/spring-projects/spring-boot/wiki/Spring-Boot-1.5-Release-Notes#oauth-2-resource-filter filter-order: 3此处的 filter-order 非常重要,因为自Spring Boot 1.5.* 之后,resource server 的 filter 的顺序默认在 basic authentication filter chain 之后,所以如果不配置此项,将会导致使用 access_token 访问 resource server 的时候返回 401 状态码。
好了,所有的开发工作已经完成,无需任何其他配置,现在我们启动服务器,并通过 Postman 访问 http://localhost:8043/uaa/users/me

因为现在还没通过认证,所以服务器将返回 401 的状态码,并返回以上的错误信息。
现在我们使用 Postman 来获取 access_token ,首先选择 Authorization Tab, 然后选择 Type 为 OAuth2.0 ,最后点击 Get New Access Token 按钮:

此时将弹出以下界面:

我们填入对应的信息:
- Token Name: access_token
- Auth URL: http://localhost:8043/uaa/oauth/authorize
- Access Token URL: http://localhost:8043/uaa/oauth/token
- Client ID: client
- Client Secret: 123456
- Grant Type: Authorization Code
此处配置的client相关信息对应了我们在 AuthorizationServerConfig 里面的配置,之前配置的回调地址也来自于此处的 Callback URL 。
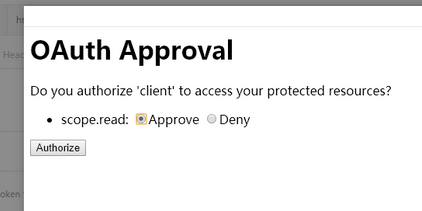
接下来点击 Request Token 按钮,在弹出的登陆界面中输入我们之前在 SecurityConfig 中配置的用户信息,选择 Approval 并点击 Authorize 按钮,即可获取 access_token :


到这里我们就成功的获取了 token,此时再次调用 users/me Api,如无意外,将会得到以下的结果:

这个项目实现了以下的功能:
- 使用 JWT Token进行认证
- 多Resource Sever
- 使用数据库存储用户以及OAuth Client信息
- 提供相关的Rest API进行用户及 Client的管理
- 结合了Spring Cloud
小结
OAuth 协议作为一种开放的,基于用户登录的授权认证方式,目前互联网很多 Open API 都对 OAuth 提供了支持,这包括 Google, Yahoo,Twitter 等。本文以 Google 为例子,介绍了 Java 桌面程序如何开发 OAuth 认证应用。在开发桌面应用访问 Web 资源这样一类程序时,一般通行的步骤是:使用 OAuth 做认证,然后使用获得的 OAuth Access Token,通过 REST API 访问用户在服务提供方的资源。
事实上,目前 OAuth 正通过许多实现(包括针对 Java、C#、Objective-C、Perl、PHP 及 Ruby 语言的实现)获得巨大的动力。大部分实现都由 OAuth 项目维护并放在 Google 代码库 (http://oauth.googlecode.com/svn/) 上。开发者可以利用这些 OAuth 类库编写自己需要的 OAuth 应用。
以上就是使用Springboot搭建OAuth2.0 Server的方法示例的详细内容,更多请关注0133技术站其它相关文章!


